It’s quite annoying when, you want to print an important document, and an Error Printing message does appear. Well, if you’re unable to print anything, because of this error. Then, don’t worry about it. There are some solutions which you can try to fix this problem.
Though, lots of users are complaining about this problem after a Windows update. If you’re also facing this error after the update. Then, incompatible and outdated drivers might be the reason behind this problem. Also, it could be a hardware-related issue. Maybe, the printer cartridge isn’t installed properly, or it’s empty. Or, maybe you haven’t inserted printing paper in the tray properly. Though, whatever the reason, here are the solutions to try. If you’re getting Canon Printer Communication Error on Windows 11, then you can read my article on it.
Fix – Error Printing Message in Windows 11/10
Solution 1: Check Printer Hardware
A loose Printer’s USB or Power cable can create trouble in printing. So, first, make sure all cables are properly connected or not. Or, if it’s a wireless printer then make sure the wireless connection is properly established. Also, make sure, the ink cartridge isn’t empty.
After that, Go to Control Panel > Hardware and Sound > Devices and Printers. And, do check whether the Printer is online or not. If your printer icon is showing blurred, that means, it’s not connected to your computer. And because of this, the Error Printing problem is occurring.
Solution 2: Clear the Print Queue.
Are you trying to print something, and nothing happening from the Printer side? Then, it could possible that the printer queue has a stuck print job. This problem arises when the Printer is Offline, and you try to print. So, to fix Error Printing, you can delete the old Print job. You can do this manually.
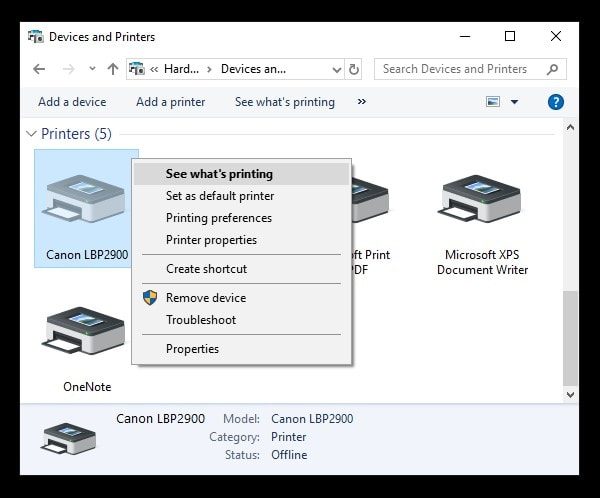
1. Open Control Panel > Click on “View devices and printers”.
2. Under the Printers section, you will be able to see all the old and new Printers that you have connected.
Right-Click on the currently active printer, and then click on the “See what’s printing” option.
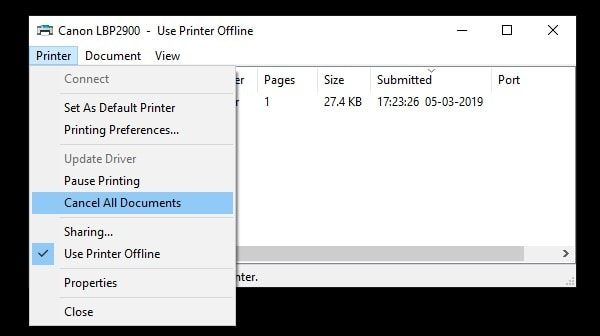
3. Here you will be able to see all Pending Print Jobs. To clear all pending documents to Print. Click on the Printer option from the menu, and then click on “Cancel All Documents”.
That’s it. Now, make sure your Printer is Online. And, first try the next solution, before printing anything.
Solution 3: Restart Print Spooler Service.
Apart from Printer Driver, there is a service that is responsible for the printing process. Print Spooler service spools print jobs. And, handles interaction with the Printer. If this service is not working properly. Then, you will not able to Print anything or see your printers. So, the best way to fix it is, by restarting this service.
There are two ways to restart the Print Spooler Service. You can open the services Window and can restart it manually. Or, can use some commands to restart.
Method 1: Use Windows Services to Restart Print Spooler Service
1. Press Windows + R key to open Run Window.
2. Once, the run window appears, Type services.msc in the run window and press enter.
3. Services window will get open, do look for the “Print Spooler” service. After that, right-click on it and then click on Properties.
4. Now, in the startup type, do select the “Automatic” option. Click on Apply > Ok.
5. After that, right-click on the Print Spooler service and then click on Restart.

Method 2: Use Commands to Restart Print Spooler Service
1. Click on the Start button in Windows 10/11, and then search for CMD. Now, click on “Run as administrator”.
2. In the command prompt now type the following commands. And, press the Enter key after each command to execute the command.
net stop spooler

del %systemroot%\System32\spool\printers\* /Q /F /S

net start spooler
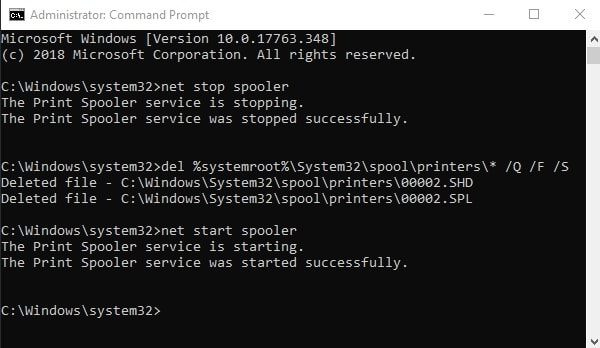
Note: The first and third command is to stop and start Print Spooler Service. And, the second command is to clear all print queues. Alternatively, you can create a batch file of these commands.
Solution 4: Reinstall Printer Driver.
In Computing, the Device driver is a program, that controls a particular device attached to the Computer. And, the Printer driver is also doing the same for the Printer. It helps Computer to identify the Printer and gives the ability Printer to Print. Overall, it does manage your Printer. So, if you’re facing an Error Printing problem in Windows 11/10. Then, by reinstalling the Driver, you can fix the problem easily.
If you have installed the Printer driver manually. Then, open the control panel and then uninstall the Printer Driver. And, after that, insert the driver CD and then reinstall the Driver.
But, if you haven’t a driver’s CD or you had lost it. Then, you can download Printer Driver software from its official site of it.
Use Device Manager.
You can also manage your Printer Driver using Device Manager. But, make sure the Printer is Connected to the Computer. Else, the Printers section will not appear in Device Manager.
Disable and Enable Printer Driver.
1. Right-Click on Windows 11/10 start button, and then click on Device Manager.
2. In Device Manager, expand the Printer section.
Right-click on your active Printer and then click on “Disable Device”.

A warning might appear, Click on Yes.
3. Now, after a minute, again right-click on the printer driver. And, this time, click on “Enable Device”.
Hope, Error Printing message got resolved now.
Uninstall Printer Driver.
Here, we are not deleting Driver software permanently. We are just uninstalling the driver software. And, on Windows restart, it will get installed automatically.
1. Open Device Manager again, Right Click on the Printer and then click on “Uninstall Device”. A warning will appear, click on Uninstall. (Don’t mark, the “Delete the driver software for this device” option.)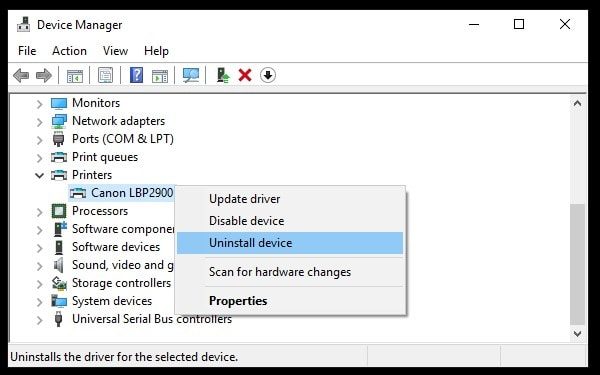
2. Now, restart the Windows, and automatically, the Printer Driver will get reinstalled.
That’s it. Though, you can also try to update the driver using the device manager. But, the Device manager will not able to find out the driver. So, you have to manually download the driver software.
Solution 5: Disconnect and Restart Printer.
If reinstalling Printer Driver, and restarting the service doesn’t solve the printer status error. Then, you can try reconnecting and restarting the Printer.
1. To turn the Printer Off, Press the Power button on the printer.
2. Disconnect the Power Cord of the Printer.
3. If it is a wireless printer, then disconnect the cord from the router. Or, if you’re using the wired printer, then disconnect USB Cable.
4. Turn off the Computer now. And, after that, wait for a minute.
5. Connect the cord again to the wireless router. (For Wired Printers – Reconnect USB Cable in a different port.) And, again wait for a minute and then start the Computer.
6. Now, reconnect the power cord. And, after that, turn on the Power button on the Printer.
That’s it, hopefully, this solution will fix the printer error.
Solution 6: Use your Android Phone to Print.
If nothing works, you need to print the document urgently. Then, you can connect your Android device to the Printer. And then, can print a document. For Wired Printer, I have already written an article. So, read my article on, “Print from Android Phone“.