Ok, So mainly for what, you do use Discord App? To talk with friends while playing Multiplayer Games like CS-GO, PUBG, Fortnite, and Apex Legends. But, you don’t know, Discord is capable to do much more than that. Discord also offers a screen-sharing and video-calling feature. As you know, On discord you can create chat servers for social, business, and Gaming Groups. So, Up to 10 people can do live video chat on your server. Also, even simultaneously can share their desktop. And, for screen sharing on Discord, no need to install any additional program.
This group video call and the screen-sharing feature can be really useful. And, it can be a competitor of much desktop-sharing software. Though, it isn’t famous, because many people aren’t aware of it. That’s why, In this article, I will explain how to configure and use the video calling and screen-sharing features of Discord. Moreover, If you’re looking for some Bots to improve your Discord Server? Check out our article on “Best Discord Bots“.
Share Screen on Discord.
First, make sure you’re using the latest version of Discord. Though, Discord automatically checks for updates at startup.
Do set up Discord for screen sharing.
Before start using the video call and screen share feature, we have to do some initial setup. First, connected Webcam and Microphone that you’re going to use. If you’re using a laptop, then an in-built webcam and mic will be enough. After connecting, you have to configure it in Discord Client settings. So, let’s go through this setup process first.
1. Open Discord Settings Page. To open, click on the User Settings (cogwheel) icon. (You can see the settings option on the right of your Discord Username.)
2. Now, from the left-hand side, click on Voice & Video. (Available under App Settings.)
3. In the voice settings, scroll down and you can find the Video Settings section.
4. Under the camera, click on the drop-down menu and select. (If you have connected the external camera to the laptop.)
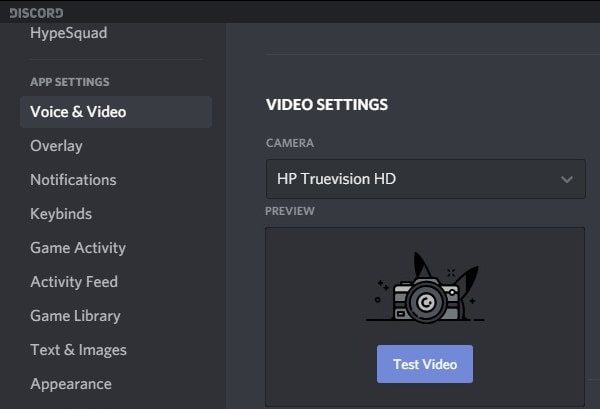
5. To make sure the camera is working or not, click on “Test Video“.
Discord Web Version.
If you’re not using a standalone Discord App. And, if you using Discord in a browser. Then, you have to give camera access to Discord, for video calling.
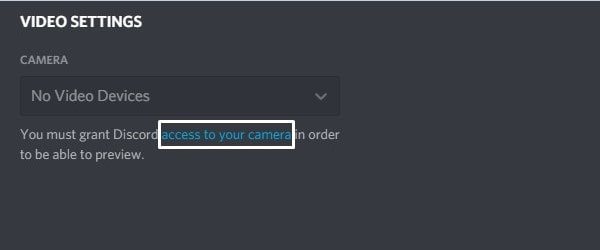
1. Simply, Open the “Voice & Video” settings page. And, in Video settings, you can see “No Video devices” will appear. Click on the “access to your camera” option.
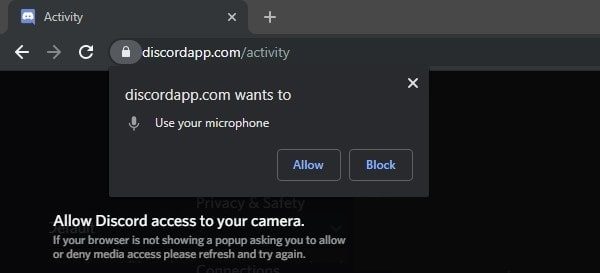
2. A small pop-up screen will now appear at the left top side of the browser. Click on Allow.
3. That’s it, Default will now appear in the Camera drop-down menu. You can “test video” to check if everything working properly or not.
4. If you’re using the Discord chat server for the first time. Then, make sure the correct input device is selected. You can select input and output audio devices on the same settings page.
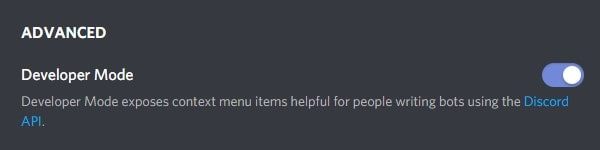
Enable Developer Mode.
Although, In the latest version of Discord, you don’t need to enable it. But still, some users were facing an issue with Discord Screen Share. So it’s better if you enable it.
1. Open Discord App.
2. Click on the User Settings Icon.
3. From the left pane, Click on Advanced.
4. And, Enable ‘Developer mode’ shown under the advanced section.
Either you can share the screen with a friend. Or you can share a screen on your Discord server voice channel. You will get to learn about both ways.
Screen Share with a Friend on Discord.
1. First, Go to the home screen of your Discord App. If you’re not on the home screen, then, just click on the Discord icon to go.
2. Add Friends – If your friend is already connected with you on Discord. Then, you can skip this step.
3. Click on Friends from the left pane and then enter ‘DiscordTag’ of your friend and then click on “Send Friend Request”. (Your Friend will get a request from your side. He just needs to click on the tick mark to accept your request.)
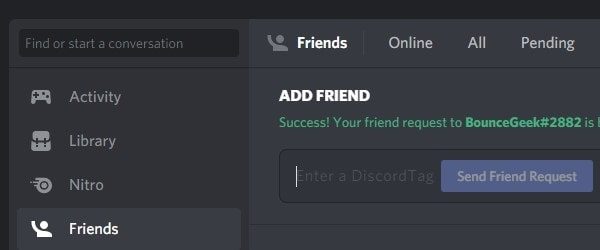
4. After adding the friend, Under the Direct Messages section, you can see the name of that friend.
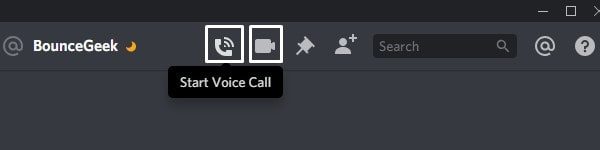
5. Click on the name and the direct message window will get open.
6. You will not directly get the screen share option. For screen sharing, you have to either make a voice or a video call.
7. On, the right side of your friend’s name in the DM window, click on “Start Voice Call” or “Start Video Call”. It’s completely up to you.
8. Once, your friend will join your voice or video call. Click on the “Share Your Screen” option.
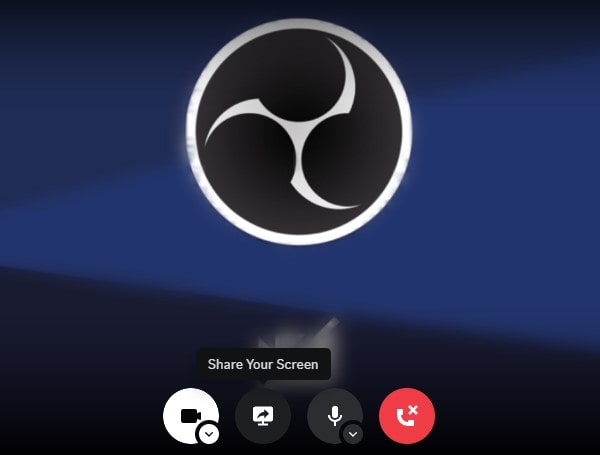
9. Now, Discord will give you two options for sharing the screen. If you ever used OBS before then you might already know, what it is.
- Screens – If you want to share your whole Computer Screen. Whatever appears on your PC. Then, keep this option selected.
- Applications – If you want to share a particular window, then click on it. And, select that Application. Here only opened window will appear.
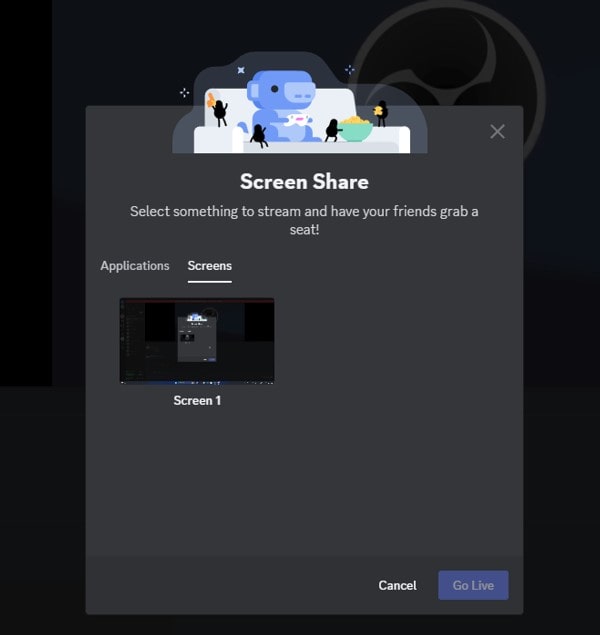
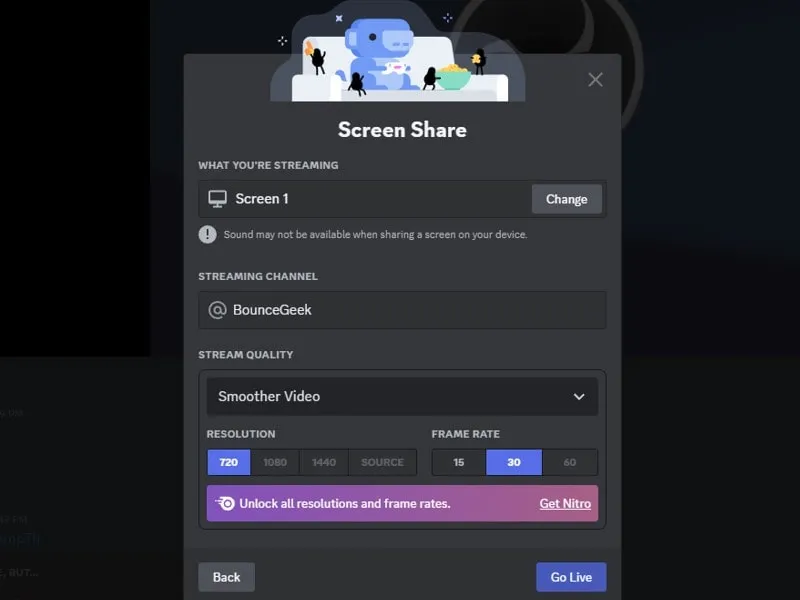
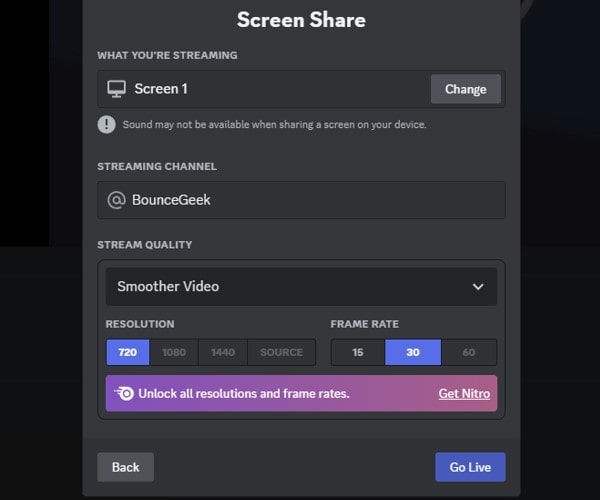
10. Next, Discord also provides you the option to select stream quality. If you have a poor or limited internet connection. Then, Select the lowest settings. After selecting your desired settings, just click on “Go Live”.
Stop Screen Sharing.
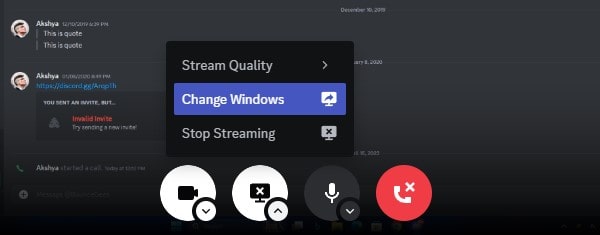
1. To stop, click on the same icon of screen share. Click on “Stop Streaming”.

2. Click on the down arrow option in Stop Streaming. And, you will get a “Change Windows” option. If you are sharing an application window then also, you can switch the window from here.
How to Screen Share in a Discord Server.
Sharing Screen with Friends method was easy, right? But, if you want to share the screen with more than one friend. Or, want to share your Computer Screen in a voice server? Then, here is the best way to do that.
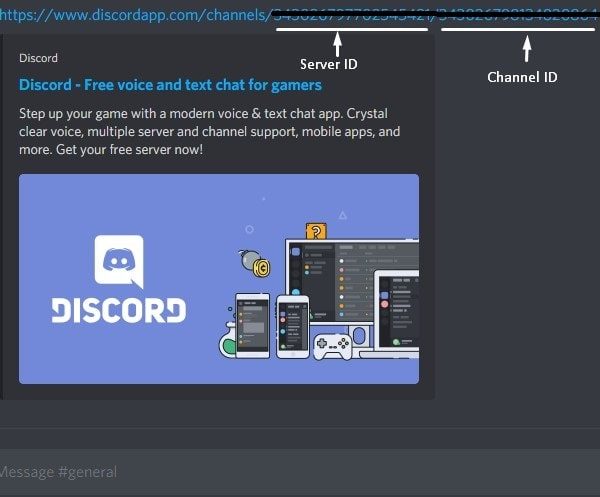
1. First, you need two things. One is Server ID and the other is Channel ID.
2. After getting both replace them with ServerID and VoiceChannelID in the below URL. (Note down this URL somewhere to edit.)
https://www.discordapp.com/channels/ServerID/VoiceChannelID
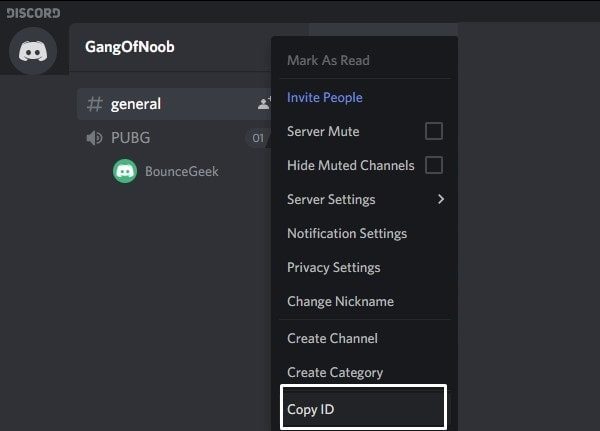
3. Right-Click on your Discord server name and then click on “Copy ID“. (Paste the copied ID instead of ServerID text in the URL.)
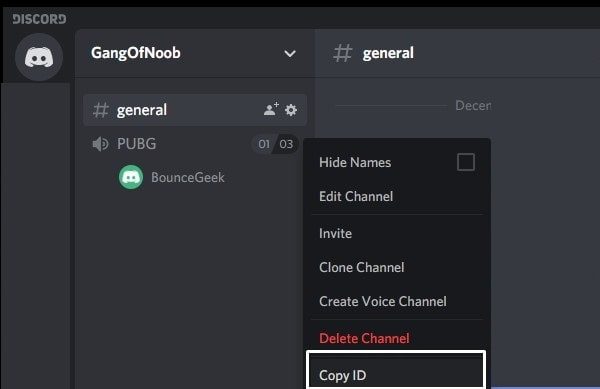
4. For Channel ID, Right-Click on the voice channel and then click on “Copy ID”. (Replace copied ID with VoiceChannelID text in URL.)
5. Copy the complete URL now and send it to your discord server. So, other friends can click and join.
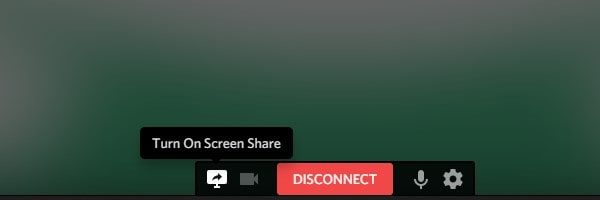
6. For Screen Share, first, connect to your voice channel. After that, click on the link that you shared.
7. Once, you are connected. You will get the option to Turn on Screen Share.
8. Follow the 5 to 7 Steps of the above section to configure screen share. So this is the way to do the discord video chat and share your computer screen. If you are facing any problems, feel free to comment.