Microsoft uses Segoe as their default system font in Windows 10. And, if you don’t like this font, then you can use this guide to change the font. Undoubtedly, Windows 10 has made life easier by adding lots of new features and enhancing user experience. But still, customization options are limited. In the earlier version of Windows, changing font for various desktop elements, including the icons, menus, title bars, file explorer, message box was easy. But, with the latest Windows 10, you’re now stuck with the default font family “Segoe UI”. Well, as I mentioned, you can still change the default system font, but it’s a little bit tricky.
By that I mean, now you have to change font manually using Windows Registry. Yes, from Microsoft store, you can install new fonts in Windows 10. You can even drag and drop custom fonts to install. But, to change the font in Windows 10 system, you have to create a custom Windows Registry file. Here’s how you can do the so.
Warning: If you’re not aware, Windows Registry is a hierarchical database, that stores low-level settings. For the applications and Microsoft operating system. Device drivers, kernel, user interface, security account manager even uses the registry. So, changing the registry can cause irreversible system damage. Though, we are making changes in user interface registry settings. That is not much risk if you follow all steps correctly. But still, I suggest you create a system restore point or registry backup first.
Change the default system font Windows 10.
Create Registry Backup.
1. Press Windows + R key simultaneously to open Run Window. Type “Regedit” and press enter. UAC window will appear, click on Yes.
2. The Registry Editor window will get open. Click on “Computer” from the left pane. Because, we want to take complete registry backup, not of the specific directory.
Next, click on File > Export. Enter “Registry Backup” or anything in Filename. Select “Desktop”, so that backup file will get saved there.
Select “All” in the export range. Click on “Save”. That’s it, within a few minutes, registry backup will get created.
If anything goes wrong, you just have to import the registry file.
1. First open Settings App. (Press Windows + I key).
Click on Personalization > Fonts.
2. You will now see many available fonts. If you want to install custom fonts, you can drop it here.
Click on the font family that you want to use. And, you can check the preview of the font. Once you decide, which font you want to change, just note down the name of it.
For Example, I want to change the default system font with Courgette. So, I only need the name of this font family, rest will be done via Registry. (Font should appear under ‘Font Preview’, then only you can change.)
Create a Custom Font Registry File.
3. Click on Start, and search for “Notepad”. Click on the first result to open the notepad app.
Next, copy and paste the following registry code into notepad.
Windows Registry Editor Version 5.00

[HKEY_LOCAL_MACHINE\SOFTWARE\Microsoft\Windows NT\CurrentVersion\Fonts]
"Segoe UI (TrueType)"=""
"Segoe UI Bold (TrueType)"=""
"Segoe UI Bold Italic (TrueType)"=""
"Segoe UI Italic (TrueType)"=""
"Segoe UI Light (TrueType)"=""
"Segoe UI Semibold (TrueType)"=""
"Segoe UI Symbol (TrueType)"=""

[HKEY_LOCAL_MACHINE\SOFTWARE\Microsoft\Windows NT\CurrentVersion\FontSubstitutes]

"Segoe UI"="Courgette"
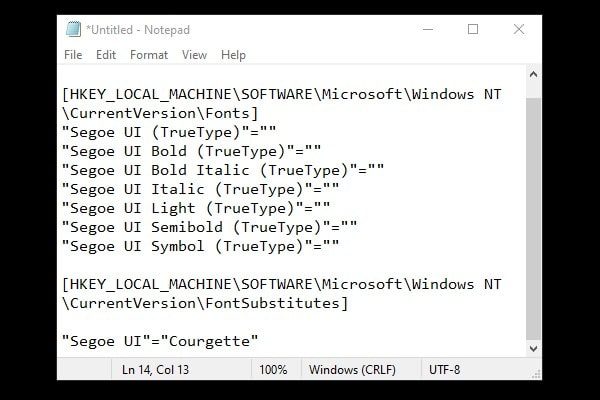
Note: Replace “Courgette” in notepad with the name of the font that you want to apply. Do type exactly that it appears in the title of the fonts settings page.
4. Click on the File > Save As. Type font name in the filename. And, add .reg as an extension. (For example – Courgette.reg) Also, select “All files” in save as type option.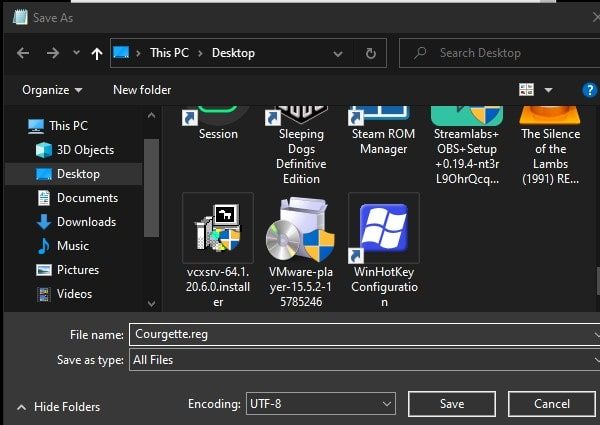
Click on save. Make sure you’re saving the registry file to the desktop.
5. Once, registry file gets created. Right-Click on it, and then click on Merge option from the context menu.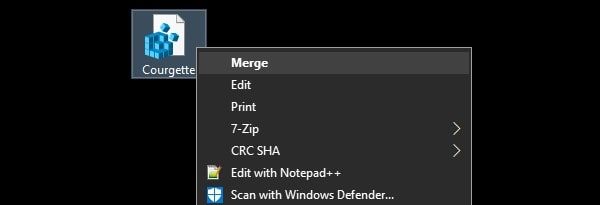

Click on the Yes button.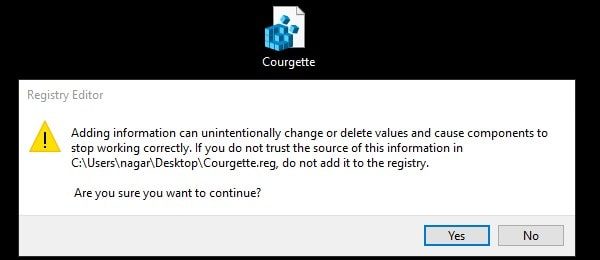
Click on the OK button.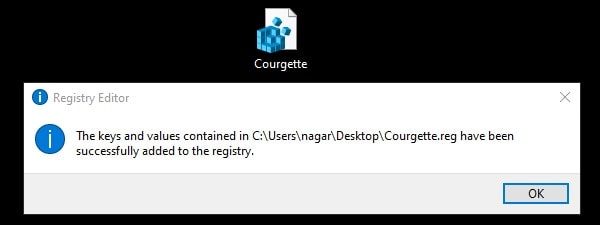
6. That’s it, to apply and see the font changes, restart Windows.
After the restart, you will see a new font family throughout almost all desktop elements. So that’s the way you can change the default system font in Windows 10.
Restore default system font.
If you don’t like the font that you have applied to. Then, you can restore the default Windows font “Segoe”. To do that, you have to create a new registry file and merge it.
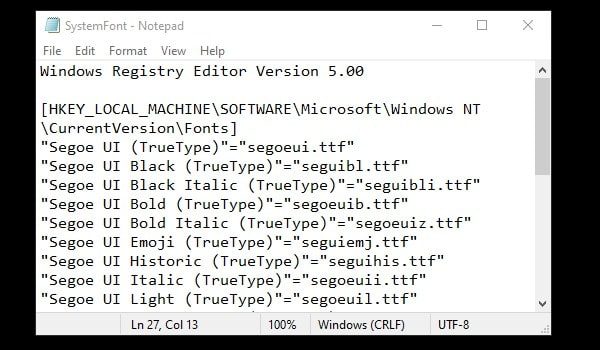
1. Open Notepad App, and paste the following registry code in it.
Windows Registry Editor Version 5.00

[HKEY_LOCAL_MACHINE\SOFTWARE\Microsoft\Windows NT\CurrentVersion\Fonts]
"Segoe UI (TrueType)"="segoeui.ttf"
"Segoe UI Black (TrueType)"="seguibl.ttf"
"Segoe UI Black Italic (TrueType)"="seguibli.ttf"
"Segoe UI Bold (TrueType)"="segoeuib.ttf"
"Segoe UI Bold Italic (TrueType)"="segoeuiz.ttf"
"Segoe UI Emoji (TrueType)"="seguiemj.ttf"
"Segoe UI Historic (TrueType)"="seguihis.ttf"
"Segoe UI Italic (TrueType)"="segoeuii.ttf"
"Segoe UI Light (TrueType)"="segoeuil.ttf"
"Segoe UI Light Italic (TrueType)"="seguili.ttf"
"Segoe UI Semibold (TrueType)"="seguisb.ttf"
"Segoe UI Semibold Italic (TrueType)"="seguisbi.ttf"
"Segoe UI Semilight (TrueType)"="segoeuisl.ttf"
"Segoe UI Semilight Italic (TrueType)"="seguisli.ttf"
"Segoe UI Symbol (TrueType)"="seguisym.ttf"
"Segoe MDL2 Assets (TrueType)"="segmdl2.ttf"
"Segoe Print (TrueType)"="segoepr.ttf"
"Segoe Print Bold (TrueType)"="segoeprb.ttf"
"Segoe Script (TrueType)"="segoesc.ttf"
"Segoe Script Bold (TrueType)"="segoescb.ttf"

[HKEY_LOCAL_MACHINE\SOFTWARE\Microsoft\Windows NT\CurrentVersion\FontSubstitutes]

"Segoe UI"=-
2. Save it as SystemFont.reg file. (Don’t forget to select “all files” in saving as type.)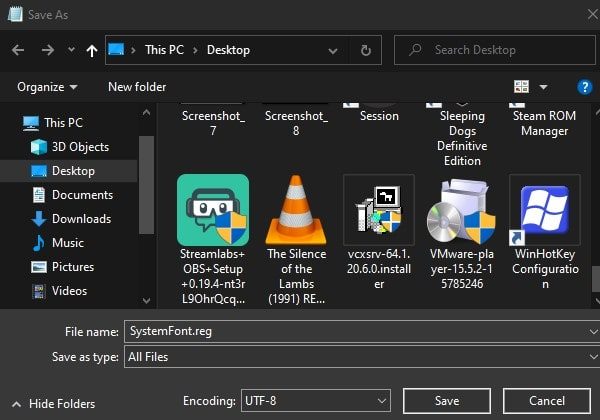
3. Now, to the rollback, the default system font, right-click on the SystemFont registry file and click on Merge.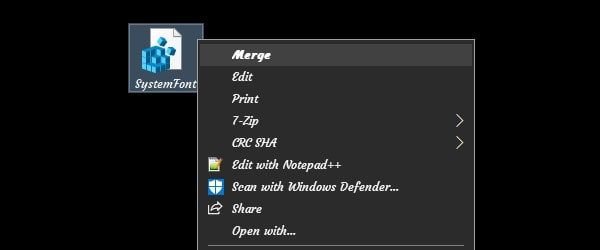
After that, click on Yes and then click on OK. That’s it, you have restored default Windows default system font. Just restart once to apply font completely. Before applying any font make sure it’s understandable. Some font families can cause issues with your installation.