There are many Android OS available for PC, like Lineage OS, Prime OS, Bliss OS, Remix OS, and few others. But, Phoenix OS is one of the oldest Android OS available for Windows and Mac. The best thing is you can dual boot Phoenix OS on your Windows PC, without affecting the original document system. The latest version of Phoenix OS is based on Android 7.1, known as nougat. There is an older version also available to download, which was based on Android 5.1 (Lollipop ). Yes, Google is already started working on Android 12. But, as of now development of this OS has been stopped. But, still, the source code of it available on Github.
Well, if you have an old laptop, in which Windows doesn’t work flawlessly. Then, you can try to install Phoenix OS on the old laptop. So, here is the Installation guide for Phoenix OS.
There are two ways to install Phoenix OS, one completely removes your windows and install Phoenix OS. But, I will not recommend that no one wants to lose their important data. So follow this step-by-step guide to Dual Boot Phoenix OS with Windows.
What is Phoenix OS.? Phoenix OS features.
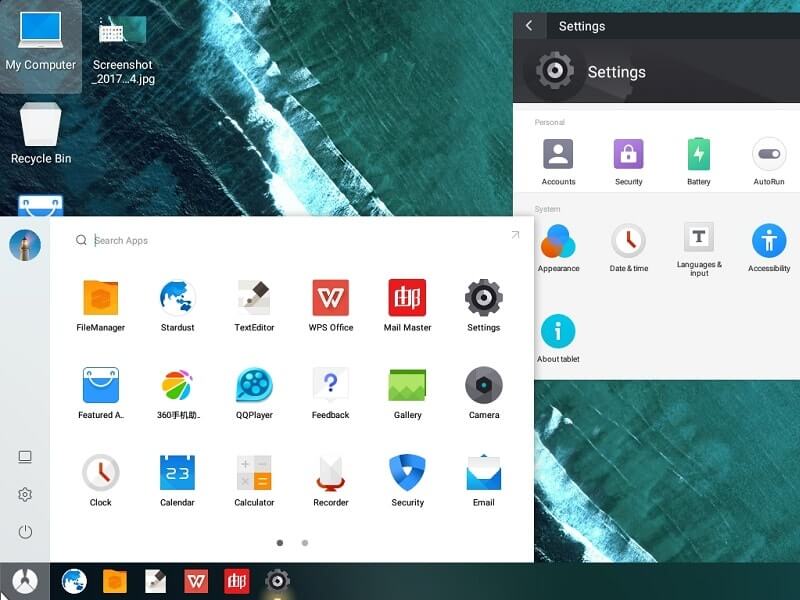
Phoenix OS is an operating system for Windows PC based on the Android 7.1 Nougat. It is suitable for tablets, desktops, computers, and other large-screen devices. It inherits many features of classic windows computer like –
- Start Menu. – Like windows, you can able to find out start button in Phoenix OS, which helps you start applications.
- Multiple Windows Design. – It offers the design of the same window that is available in mac and windows. You can resize and move windows, title bar also available.
- File Manager. – It supports classic file manager and LAN access, you can drag and drop the file and access local computer files.
- Notification center and browser. – Like windows 10 you can find the notification center. Which allows you to change quick settings like WiFi, Bluetooth, screen rotation, and a few others. Instead of the Android browser, you can find Stardust browser but you can download chrome also.
Dual Boot Phoenix OS and Windows 10
Download Phoenix OS – Phoenix OS Download Links
1. The official site of Phoenix OS is currently isn’t loading because of the HTTPS certificate issue. Well, by replacing HTTP with the HTTPS in Phoneix OS site URL, you can open it. I have created an HTTPS link.
2. Once the website gets loads, you will find two PhoenixOS installers. So, If you’re using the 64-bit operating system then you can download PhoenixOSInstaller-v3.6.1 (Based on Android7.1).
Or, if your system type is 32-bit then you can download PhoenixOSInstaller-v1.6.1 (Based on Android5.1).
Download Exe Installer from MEGA Download Link. Because Google drive will show you an error.

How to Check System Type?.
1. To check the system type in Windows 10 OS. First, press the Windows + I key to open the Settings App.
2. Click on System > About. Here in the device specification, you can check your system type.

If you’re using an older version of Windows, then, right-click on My Computer and then click on Properties.
Note: Don’t download the ISO file, because installing Phoneix OS through the ISO file process is a little bit complicated. So for hassle-free installation download Exe Installer.
Create a Partition to Dual Boot Phoenix OS
There are dozens of Partition manager software available on the internet, but you don’t need to download any third-party software. Windows comes with the inbuilt option known as Shrink Volume.
Step: 1 If you’re using Windows 10 then Right-click on the start button and then choose disk management.
Step: 2 A window will open, Select the Drive in which windows 10 is Installed & Right Click on it, and you can see the Shrink Volume Option just Click on it. (you can choose other drives too If you don’t have enough space in the C drive.)
Step: 3 Enter the amount of space to shrink the field enter 20000. (which is around 20GB) and then hit the shrink button. The process will take around 5 – 10 minutes to complete, don’t shut down the computer because the process will run in the background. (I have created a 50 GB Partition for the OS Installation.)
Right-click on the created partition and then choose to create the new volume, complete the wizard by clicking on next and format your drive using it.
If you’re facing any issue while shrinking volume then follows this Guide. – Shrink Windows 10 Partition and make space for Linux.
Phoenix OS Latest Installation Guide
There are two ways to run Phoneix OS on your Windows PC, You can either use a USB Storage Drive or, you can Install Phoenix OS on the created partition. If you don’t have space to shrink then USB Drive is the best option.
Step 1: First, Right-click on the Phoenix OS Installer file that you have downloaded and click on “Run as administrator”.

Phoenix OS Setup wizard will get open, and, you’ll get three options.
Alternate Method – Make U-Disk – If you want to install it on USB Drive then choose to Make U-Disk and then select Drive and choose Write option. After that simply reboot the system and choose Phoenix OS from the boot menu.
Step 2: If you want to install Phoenix OS on your hard drive, then, click on the Install button. (Yes, you can uninstall Phoenix OS from your hard drive later easily.)

Install Phoenix OS to Hard Drive, Window will now appear. Select the hard drive partition that you’ve created for Phoenix OS. Click on Next.

Important: Be careful while selecting the drive, don’t select Windows Drive. Also, make sure there isn’t any data in the selected drive.
Step 3: Now, the setup will ask you to select a data size to create a data image for OS. You can select the data size as per your partition size. I have created a 50 GB partition, so here I am selecting the 32 GB option. You can comment down below if you still have confusion about what to select.
Click on install.

Step 4: Now, Just Wait – The installation process will now take almost 10-20 minutes depending on your computer performance.

And whenever the process will get completed you will get the “Phoenix OS successfully installed” message.
Step 5: Now, to boot into Phoneix OS, click on the Reboot Now option.

You”ll also notice a “start Phoenix OS” icon on your desktop. This is also to boot into Phoneix OS.
![]()
Step 6: Once, Windows get a restart, you will get two options. Yes, you have successfully dual-booted Windows and Phoenix OS.
Windows
Phoenix OS
Use Arrow and Enter key to select Phoneix OS.

Your PC will now detect Phoenix OS and the System Intialiazing process will get started.

Step 7: Once the installation process gets completed, the welcome screen will appear. Select English language and click on Next.

Next, you have to agree to the User License Agreement.
Step 8: After that, connect to your WiFi network and click on next.

Phoenix OS will now ask to create a User Account. Enter your name and click on Finish.

That’s it, Phoneix OS will now get open. Enjoy Android OS on your old Computer.
Fix Verification Failed (15) Access denied error.
If you’re using an HP laptop then you’ll face Verification Failed (15) Access denied error – To fix this error go to Bios setting and then disable Secure Boot. After that restart your PC and press Esc and delete to enter into the BIOS setup and choose Phoenix OS.
Wait for 5 minutes Phoenix OS will boot up, Now select English and set up WiFI and user Info, and Done. Enjoy Android Nougat on your Windows PC, If you want to exit then simply shut down Phoenix OS and then on PC to enter into Windows.
Uninstall Phoenix OS
Want to remove Phoenix OS completely from your Hard Disk.? Here is a quick guide –
Run Phoenix OS Installer and then choose Uninstall Button. It will uninstall Phoenix OS within a Minute. Or if you installed on USB Drive then go to My computer > Right-click on USB Drive and then Choose Format option. It will remove all Phoenix OS data from your USB Drive. Personally, I will suggest you use Rufus Tool to create a non-bootable drive. Also, If you have an ISO file of Phoenix OS then use the Rufus tool to create a Bootable USB of Phoenix OS.