Windows 11 has become the most widely used operating system. Because of its simplified user interface. If you compare Windows 7 with Windows 11 or Windows 10. Then, You will know that Microsoft made tons of changes to the user interface and features. But, one thing which is still the same in almost all Windows versions, is Windows Explorer aka File Explorer. But recently, many Windows users experiencing problem with it. Windows explorer keeps crashing and getting frozen. And, users are getting an error message “Windows explorer has stopped working”.
Though, there could be multiple causes behind this error. Because Windows Explorer is not only a file manager. It also presents user interface items like taskbar and desktop. In most cases, some third-party programs create conflicts with Windows explorer. That leads users to a Windows File explorer crashing problem. But, don’t worry about it, because you can fix this problem by trying certain solutions. Here are some working solutions to fix the “Windows explorer keeps restarting and crashing” problem.
Windows File Explorer Keeps Crashing
Solution 1: Uninstall the unwanted programs
As I mentioned, some software can create conflicts. Which can create problems with Explorer. If you have installed a third-party file manager. Or, software to customize the desktop. Then, you have to uninstall it immediately.
I suggest you open Control Panel > Click on Uninstall a Program. And, then check all installed Windows programs. If you found any suspicious program, then uninstall it.
Solution 2: Uninstall Third-Party Extensions
If you have installed some add-ons in Windows explorer. Then, it can slow explorer or can lead to Windows Explorer Keeps Crashing problem. It could possible that you haven’t installed any extension manually. But maybe, some other software did install add-ons automatically to manage files.
To disable all non-Microsoft extensions. You can use ShellExView by nirsoft. It is a free tool. But, you have to download the correct version of it. According to your system type. For example – my system type is 64-bit. That’s why I have downloaded the x64 version.
1. Extract shexview-x64 zip file using 7Zip. And, then run shexview application.
2. Click on options and then mark “Hide All Microsoft extensions”. (Microsoft extensions are required for Windows Explorer to get run. Hiding it will help us to remove third-party extensions.)
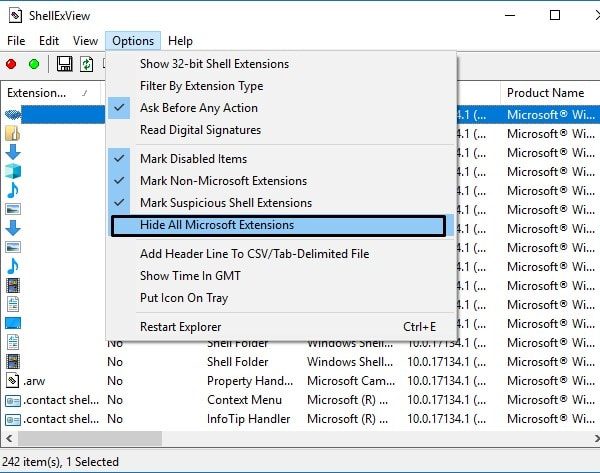
3. Now select all remaining extensions by pressing Ctrl + A key simultaneously.
4. And, then right-click on it and then choose “Disable Selected Items”.
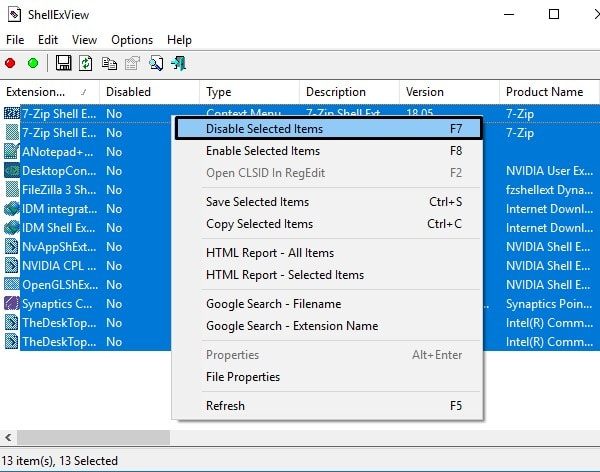
IMPORTANT: This option will disable all third-party extensions. And, if Windows Explorer crashing problem gets resolved with it. Then, try enabling extensions one by one. To find out culprit extension or add-ons.
Solution 3: Disable Thumbnails Preview
If there are so many images in a folder. Then, thumbnails can crash Windows Explorer. Because thumbnails or image preview takes time to get loaded. It makes Windows Explorer extremely slow, if you’re using HDD.
To disable thumbnails and show icons. Follow these instructions.
1. Open Control Panel. Click on the category and then select the large items option.
2. Click on “File Explorer Options”.
3. Click on View. And, then mark “Always show icons, never thumbnails”.
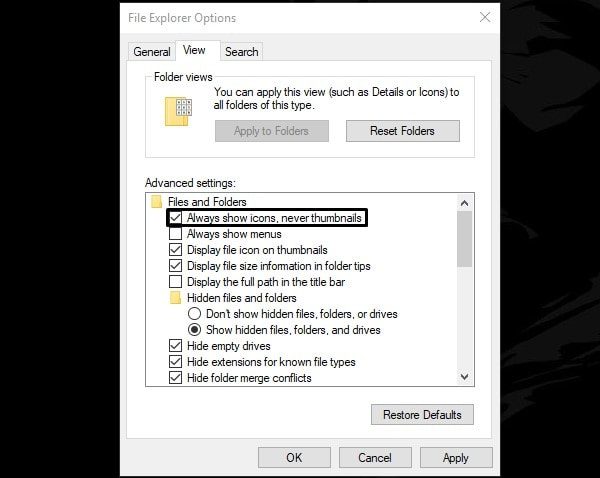
4. After that, click on apply, then click on OK.
That’s it. Now, Windows File Explorer will not show thumbnails. Also, don’t forget to restart Windows to apply changes.
Solution 4: Launch Folder Windows in a separate process
By default, Windows 10 opens folders into a single process. Though, it’s good to manage the Windows process effectively. But sometimes, these processes could create conflicts. And, this leads to windows 11 File explorer keeps crashing error.
1. Open the same File Explorer Options Window from Control Panel.
2. Click on the View tab. Scroll down a little and mark the “Launch folder windows in a separate process” option.
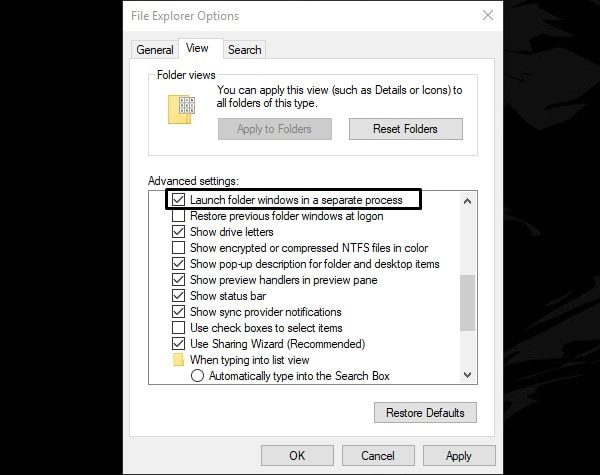
3. Click on Apply, and after that click on OK.
Solution 5: Check for Windows Update
Recently, In the new version of Windows, Microsoft added a few bug fixes for Windows explorer. So, you have to make sure, your Windows is up-to-date.
- Open the Settings App in Windows 10 by pressing Windows + I key simultaneously.
- After that, click on “Update & Security”. In Windows 11, Click on Windows Update.
- And, then click on the check for updates option. That’s it.
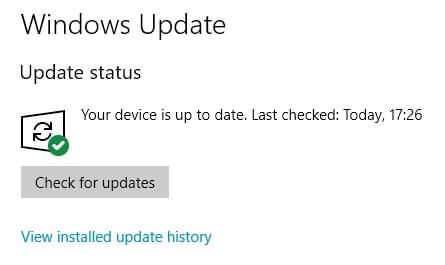
Now, Windows will search for available updates. And, they will provide you an option to download and install updates.
Solution 6: Clear Windows File Explorer History
Windows Explorer has the functionality to keep a record of all recently accessed folders. But, if the recently accessed folder got infected. Then, explorers can react weirdly. Or, specifically, I can say, Windows explorer keeps crashing problems can occur. So, clearing explorer history could help you to fix this problem. Though, it doesn’t work for many users. But, still, you can give it a try.
1. Open Control Panel.
2. And, just search for “File Explorer”.
3. From search results, click on File Explorer Options.
4. Now, under the privacy section. You will be able to see the Clear option.
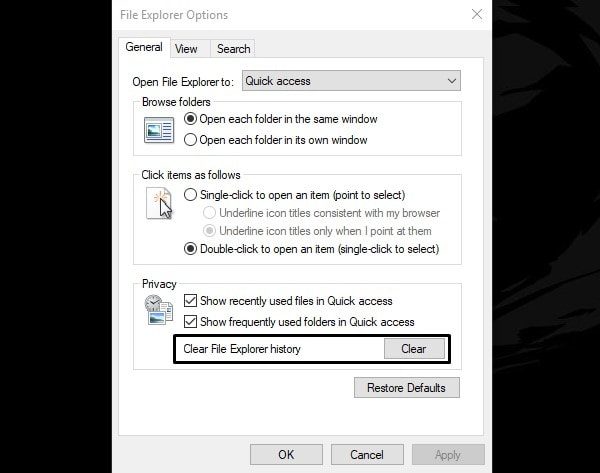
5. Click on it once. And, explorer history will get erased immediately. After that, click on OK.
6. Restart Windows Explorer.
Solution 7: Restart Windows Explorer
In most cases, restarting the system can solve many problems. But to fix Windows explorer, you don’t need to restart Windows. You can simply restart explorer using task manager. And, it will be enough to fix the Windows explorer keeps crashing issue.
1. Right-Click on the Windows Start button and then click on Task Manager.
2. Now, if the Windows Explorer process is running. And, is shown in the Apps section. Then, you can restart it easily by right-clicking on it.
3. But, if you’re unable to restart it. Then, use the End task option.
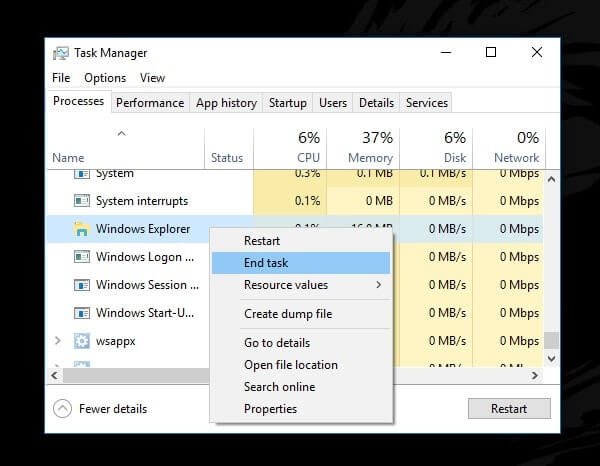
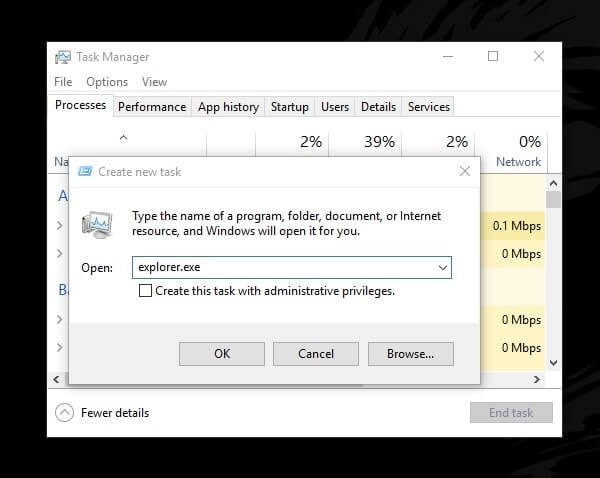
4. After ending the explorer running process. Click on File > Run new task.
5. In creating a new task Window. Type explorer.exe and press enter. Or, click on OK.
That’s it. Now, Windows explorer will not crash. Until a program doesn’t interfere with its process.
Solution 8: Copy Explorer in System32 Folder
If it’s an indexing issue, then you need to move explorer. Though, instead of moving it. I suggest you copy it inside the system32 folder. Many users was able to solve explorer crashing problem with this solution. So, I suggest you give it a try. But, before trying out this solution. Make sure File Explorer is closed.
Note: If Windows Explorer is crashing after a few minute of opening it. Then only, you can try this solution.
1. Open the C:\Windows folder. And, then copy explorer.exe by right-clicking on it.
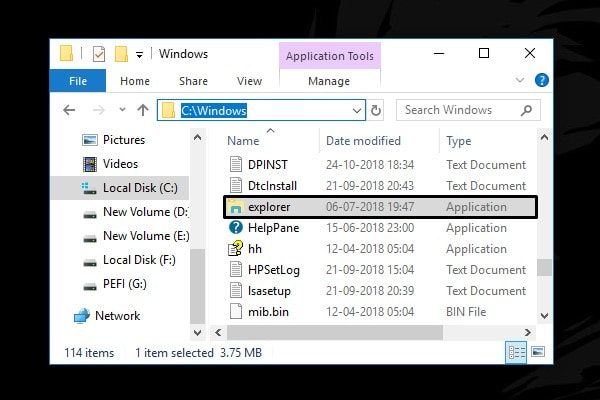
2. Now, paste it inside C:\Windows\System32 folder.
After copying it inside the system32 folder. Run explorer from the same system32 folder.
Solution 9: Run SFC Scan
It could possible that system files got corrupted. So, I suggest you run a system file checker scan. It will fix corrupted system files.
SFC Scan. (System File Checker.)
1. Click on the Start button and search for CMD. From search results, right-click on Command Prompt. And then click on run as administrator.
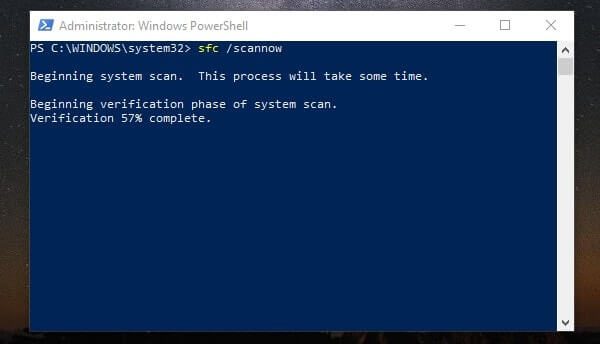
2. In Command Prompt. Type the following command.
sfc /scannow
Solution 10: Check Disk for Errors.
Open Command Prompt (Admin).
Type chkdsk C: /f /r /x in CMD and press enter.
To confirm disk scan hit y and then press enter.
- /f To fix HDD errors.
- /r Used to locate bad sectors.
- /X To force the drive to dismount before checking the disk.
Solution 11: Perform DISM Scan
For DISM scan. Type these following commands one by one in CMD. And, press enter after each command.
DISM /Online /Cleanup-Image /CheckHealth

DISM /Online /Cleanup-Image /ScanHealth

DISM /Online /Cleanup-Image /RestoreHealth
Solution 12: Run Windows Memory Diagnostic
WMD is a free memory test program. It will force BIOS to run a comprehensive test on the memory.
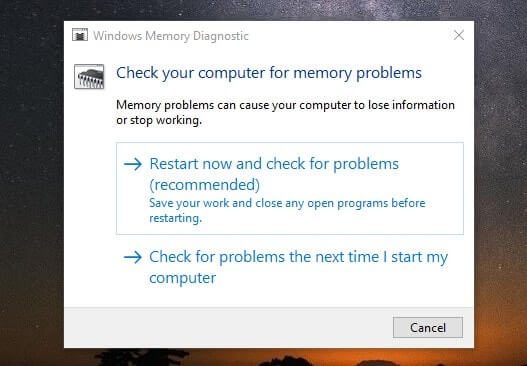
- Click on the start button and search for Windows Memory Diagnostic.
- Open WMD by clicking on search results.
- Click on “Restart now and check for problems”. That’s it. The computer will get restarted and look for memory problems.
- After testing memory you can check results inside Event Viewer.
- Go to Control panel > Administrative Tools > Event Viewer.
- From the left side, click on Windows Logs > System.
- Now from the right pane select “Memory Diagnostics Results” to see the test results.
Solution 13: Start Windows into Safe Mode
This is the best solution, that you can try. It is a diagnostic mode of Windows OS. It only allows essential programs and services to start. So, if in safe mode Windows is working fine. Then, you can perform a clean boot. Which will allow only the use of Microsoft services to get run. And, will terminate all non-Microsoft services. Which will help you to fix Windows Explorer Keeps Crashing problem.
1. Open Run Window (Press Win + R key.), type MSConfig and press enter.
2. Click on boot and mark the safe boot option. If you need internet in safe mode. Select the networking option. And, then click on apply then OK.
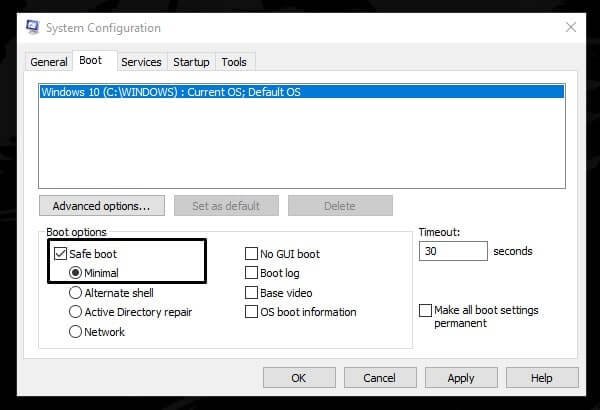
Click on the Restart button. To boot into safe mode. To exit from the safe mode, open the same configuration window. And, this time unmark safe boot option and then apply changes.
Solution 14: Perform a Clean Boot
1. Open the System Configuration window.
2. In the general tab, Click on selective startup. And, unmark load startup items option.
3. Click on the services tab. Mark the “Hide all Microsoft services” option. Click on disable all.
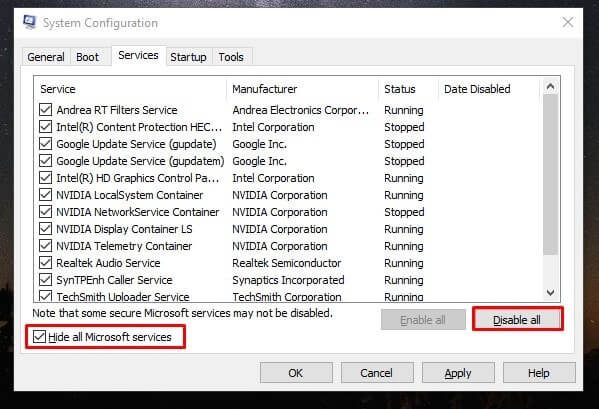
4. Click on startup. And then click on open task manager.
5. Now, disable all startup items one by one.
6. Click on Apply. Click on OK. And, then restart Windows.
Hopefully, this solution will fix the Windows explorer keeps restarting problem.
Solution 15: Try Windows File Explorer Alternative
If File Explorer doesn’t work, even after trying these solutions. Then, you can try alternatives. There are many Windows File Explorer Alternatives available, which you can try. Personally, I suggest you use explorer++. It comes with a similar interface and advanced features. Here are some Best File Explorer Alternatives for Windows 11.
