If you want to disable your laptop keyboard so that kid cannot press keys. Then, you can find certain Apps to do so in this article. Most Windows laptops start creating issues after a few years of continued usage. Mostly battery and keyboard-related issues users face in their laptops. Replacing laptop keyboards isn’t that easy compared to PCs. Because you have to completely open it in order to replace the keyboard. Well, in that case, using an external keyboard is a good idea. But, if your internal keyboard is creating trouble while using an external keyboard. Then, you can simply turn off the laptop keyboard. Yes, there are certain ways to disable Laptop Keyboard Temporarily or Permanently. But, I suggest you use Apps to Disable your Windows Keyboard.
How to Disable and re-enable Laptop Keyboard.
1. Use Device Manager to temporarily disable Laptop Keyboard.
Let’s start with the official way to disable the keyboard. Removing the keyboard without having a replacement keyboard isn’t a good idea. So, here is the quickest way to disable your standard laptop keyboard. Before we start, remove the external keyboard.
1. Open Device Manager
Windows 11 – Press Windows + X key, then from the menu click on device manager.
In the older version of Windows – Press Windows + R key to open run Window. Type “devmgmt.msc” and press enter.
2. In device manager, you can install and uninstall devices and drivers.
So, expand the Keyboard section, and you”ll able to see “Standard PS/2 Keyboard”. (Keyboard name can be different here.)
First, click to highlight it, then right-click on it. And, then click on the “disable” option to temporarily disable the keyboard. If disable option isn’t available then you can use the “Uninstall device” option. After clicking on that option, you”ll get a warning. You need to click on “OK” to start the uninstallation process.
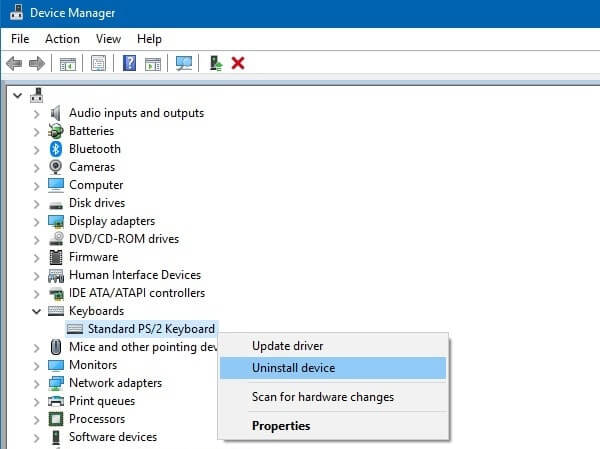
IMPORTANT – Now, don’t use the restart option shown in the device manager. Shut down your laptop manually, then start. After starting up the laptop, the keyboard will get disabled.
Note: If you have used the “uninstall device” option. Then after restart keyboard driver will auto-install again. So, I suggest you try the next method. Enable Keyboard – And, if you want to enable laptop keyboard again. Then, the only way to enable the keyboard is, restart your computer.
2. Use KeyFreeze to Turn off the keyboard and mouse in Windows 11.
If your kids watch videos on your laptop. And, you want to prevent accidental keyboard and mouse press, then you can use the Keyfreeze tool. It is a small program that blocks your keyboard and mouse without “locking” the screen. It is also helpful when any important task running on your laptop. Using this software is quite simple.
1. First, Download KeyFreeze App from the official site and then install it on your laptop.
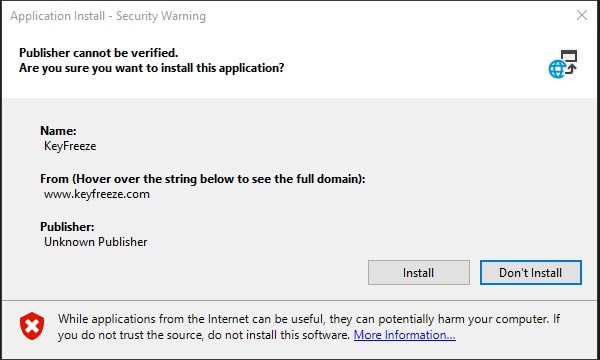
2. Once, this app gets installed a small App window will appear.

Now, to Lock Laptop Keyboard and Mouse, just click on the “Lock Keyboard & Mouse” option.
How to unlock laptop keyboard and mouse?.

To unlock first you have to press Ctrl + Alt + Delete key simultaneously. And, after that press the Esc key. That’s it, your keyboard and mouse will get re-enabled.
3. Use KidKeyLock to Disable and Password Protect Keyboard.
KeyFreeze App locks mouse and keyboard together. And, if you don’t want to disable your mouse. Then, you can use KidKeyLock App. This App offers many customization options. You can lock a specific mouse key. Also, there are three different options for keyboard locks to choose from. Once you lock the keyboard. You have to press two passwords one by one to unlock the keyboard. Though, don’t block keyboard and mouse keys together using this App.
1. First, download KidKeyLock App from the UpToDown site. And, install it on your Windows PC.

2. Once it gets installed it will lock your right-mouse key by default.
You will see the KKL software icon in the system tray. Click on it and then click on setup.

3. Once, setup window appears, you can unmark all mouse locks and then click on OK.
4. Now to lock the keyboard, use the slider option below the Keyboard Locks. To lock all keys slide it till the end and then click on OK.
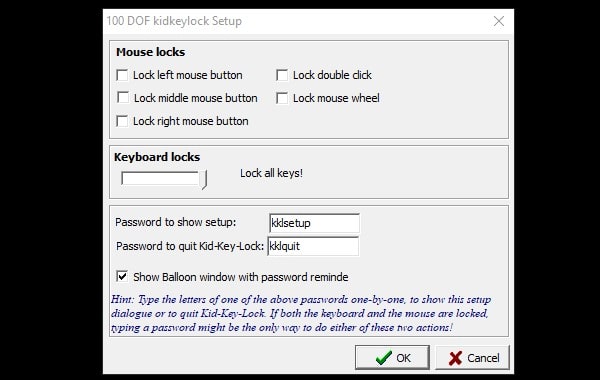
5. KidKeyLock will show you two passwords. So, when you want to unlock the keyboard, type those two passwords anywhere. (Typing will not visible, so just type the password.)
So that’s how you can disable the laptop keyboard using the KidKeyLock Application.
4. Use Keyboard and Mouse Cleaner App.
If your laptop or computer, stays turn on always. And, you want to clean your laptop while it’s on, and want to avoid accidental key presses. Then, the “Keyboard and Mouse Cleaner ” App will be helpful for you. With this App, you can block the keyboard and mouse for a certain period of time. For example, you can set 30 seconds. And, when 30 seconds will get over, keyboard and mouse automatically get enabled. Don’t set too much time, because, you cannot interrupt the process.
1. Download Keyboard and Mouse Cleaner App zip file from CNET.
2. Once the file gets downloaded, extract it using the 7Zip or Windows built-in option.
3. Open extracted file and run “Desactivar Teclado e Rato” App as administrator. (App name written in Galician language.)
4. No need to install the App. Once App gets open enter time in seconds. And, click on the cleaner brush icon.

That’s it, now clean your keyboard and mouse. And, once the time gets over, keyboard and mouse get enabled.
5. Permanently Disable Laptop Keyboard using GPE.
In the first solution or method, I have mentioned that, after restarting Windows. The laptop keyboard driver will get installed again. But we can prevent keyboard installation by changing few settings through GPE. So, if you need a permanent solution to disable the laptop keyboard. Then try this method, after disabling the driver from the device manager. One thing you need to know for certain versions of Windows GPE is not available.
1. Open Group Policy Editor (GPE). First, press the Windows + R key then type “gpedit.msc” and press enter. Or, you can search for a group policy editor using the Windows search feature.
Note: If GPE is missing from your computer. Then, you need to install it using the Gpedit enabler file. If you need that file, feel free to comment.
2. In GPE, Click on Computer Configuration. Then go to Administrative Templates > System > Device Installation > Device Installation Restrictions.
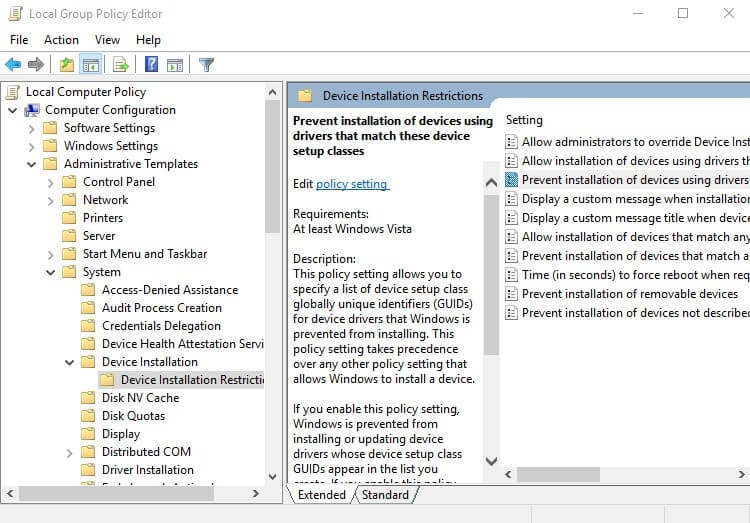
3. Now, on the right side of the screen, you”ll get a couple of options. Click on “Prevent Installation of devices using drivers that match these device setups classes”
4. After that, right-click on it and then click on edit. A new window will open up now.
You need to set enabled in that Window. And, then click on “Apply” then click on “OK”.
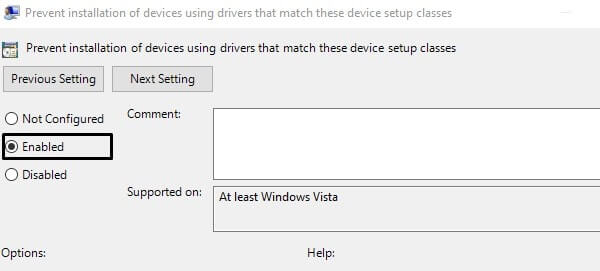
That’s it, this will prevent the keyboard to get installed again. If you want to enable the keyboard in the future. Then, you need to go through the same GPE settings. And, then you need to set that option to disabled. After that, to install the keyboard again, you need to restart Windows. Also, If your Laptop Keyboard not working? then you can read my article on it.
Summing-up.
You can either use Windows Device Manager and can disable the laptop keyboard from it. To prevent accidental key presses by Kids you can use KeyFreeze App. It will disable the keyboard and mouse both. Though, to disable the keyboard only, you can use KidKeyLock App. Or, if you want to just clean the laptop keyboard when it’s turned on. Then, there is an App for it as well. And, if you want to disable the internal keyboard permanently then you can use Group Policy Editor.

