
Updates are very important part of Windows OS. But, nowadays, Windows updates are coming with some bugs. Here, I am not talking about issues you face during updates. Users are facing high disk and high CPU usage after Windows updates. Issues like high CPU usages occur due to multiple reasons. Previously, I have written an article about WMI provider host high CPU usage. But, In this article, I am talking about “Service host SuperFetch”. Many Windows users are claiming that, this service is using 100% CPU usage.
Normally, Windows uses approx 10% CPU and 0% disk, when you start Windows. But due to these services, Windows is using too much CPU power. There are three services, which creates problems.
- Service host SuperFetch.
- service host local system.
- Service host local service (Network Restricted.)
What is SuperFetch?.
According to Microsoft “Superfetch is Windows service, that maintains and improves the system performance”. Superfetch was first introduced in Windows Vista, it analyzes RAM usage and Apps that you run. If you have good specification PC, then you” ll not notice any CPU and RAM usage. But, if you have old Windows PC, and you’ve updated Windows. Then you might face high CPU and disk usage. Because it runs in the background. Although Superfetch doesn’t require much CPU power. But, if the SuperFetch is using much CPU power, then you can disable it.
At the system startup, SuperFetch preload bunch of data from HDD. That’s why users face 100% disk usage. But, if you’re using SSD, then you will not face such problems. Because SSD is too fast, you don’t need preloading of data. SuperFetch is also quite helpful, So I don’t suggest you disable it. It decreases boot time, learns usage pattern and loads Apps quickly.
Fix Service host SuperFetch high CPU.
Solution: 1.1 Disable SuperFetch.
You can disable SuperFetch from Windows Services. But disabling it does not solve the issue, we need to stop it from the auto restart.
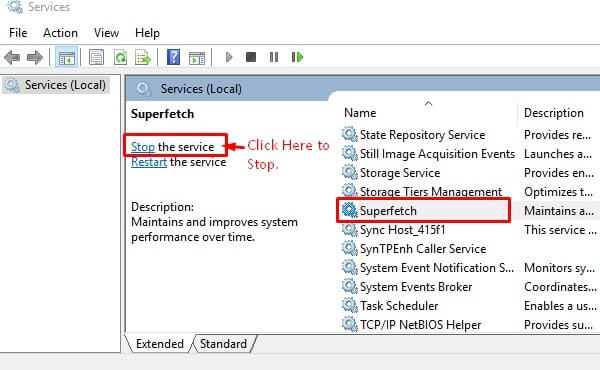
1. Press Windows + R key, then type “services.msc” and press enter.
2. In Windows Services, look for “SuperFetch” and click on it to select. Then, on the left side, click on Stop button to stop this service.
3. Now, we need to stop it from the auto restart. To do that, Right Click on Superfetch then click on Properties.
– In Properties Window, Select “Disabled” option in startup type. Click on Apply then, OK.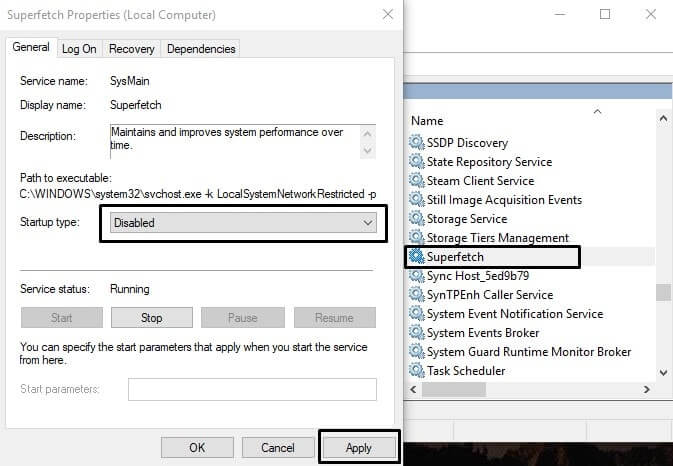
Solution: 1.2 Stop Superfetch using CMD (Admin).
If due to any reasons, you’re unable to stop Superfetch from Windows services. Then, you can use Command Prompt or Windows Powershell. To Open, CMD or PS, Right Click on Windows 10 icon and then click on Windows Powershell.
If you’re using an old version of Windows, then open “run” Window (Press Windows + R key) and type “CMD” and press enter.
In Windows Powershell or CMD, type the following command and press enter.
net.exe stop superfetch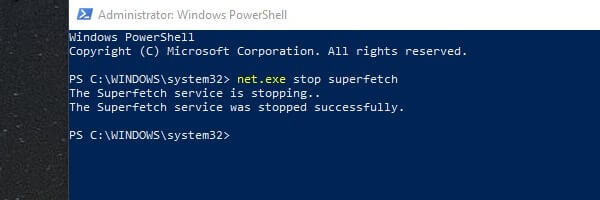
After giving this command with admin permission, you”ll able to see a message. “The Superfetch service was stopped successfully”.
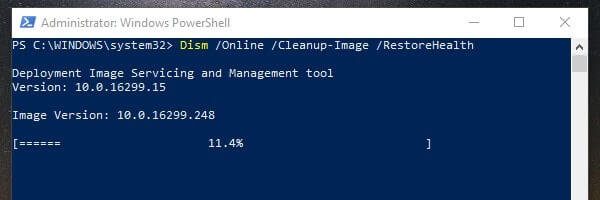
Solution: 2 Perform an SFC & DISM Scan.
It could be possible that, while updating Windows, some files got corrupted. Windows comes with system file checker tool, that repair missing or corrupted system files. When Windows function doesn’t work and some service like “Service host superfetch” does misbehave. Then, SFC Scan is the best way to troubleshoot problems.
Open Command Prompt (Admin), and then type the following Command and press enter.
sfc/scannow
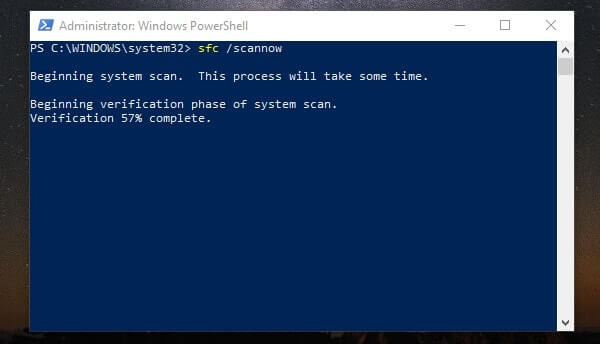
Now, wait for the scan to get complete. After completing SFC Scan, use this command line to repair Windows image.
dism /Online /Cleanup-Image /RestoreHealth
Now, check CPU and disk usage, if the issue still occurring then try next solution.
Solution: 3 Fix Memory Leak.
If after trying out first two solutions, Service host Superfetch still using high CPU Power. Then, you can try this solution to fix the problem.’
Open Run Window and type regedit and press enter.
In registry editor go to the following directory.
Computer\HKEY_LOCAL_MACHINE\SYSTEM\ControlSet001\Services\Ndu

Now, In the right pane, locate “Start” and right click on it, then click on modify.
Set value to 4 and then click on OK.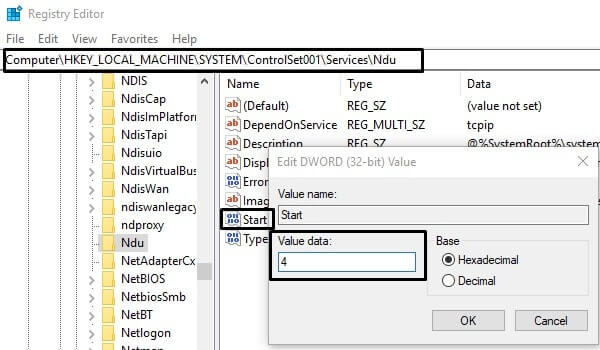
It will disable it and will plug the memory in non paged pool.
Read Also: Fix Windows 10 memory leak and high CPU usage.
Solution: 4 Use Windows Troubleshooter.
Have you recently updated Windows, or trying to update?. Then, it could be some Windows updates related issues. Windows Comes with troubleshooting option for multiple problems. So, I suggest trying Windows troubleshooter to fix Service host Superfetch.
Press Windows + I hotkey to open settings.
In Settings App, go to update & Security > Troubleshoot > Windows Update > Run the troubleshooter.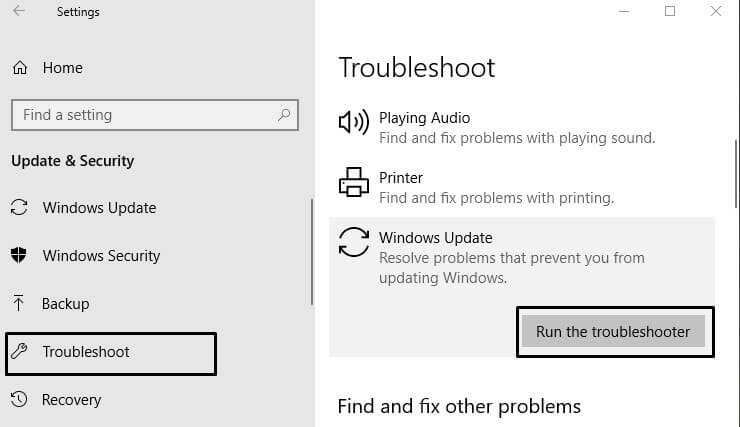
Solution: 5 Perform a Clean boot.
Sometimes third party Windows services create problems. And, if service host is causing the problem. Then, by performing the clean boot. Means, by disabling Microsoft services, you can resolve it.
1. Press Windows + R key and type “msconfig” and then press enter.
2. In system Configuration click on services tab, then mark “hide all Microsoft services”.After that, click on “disable all” button.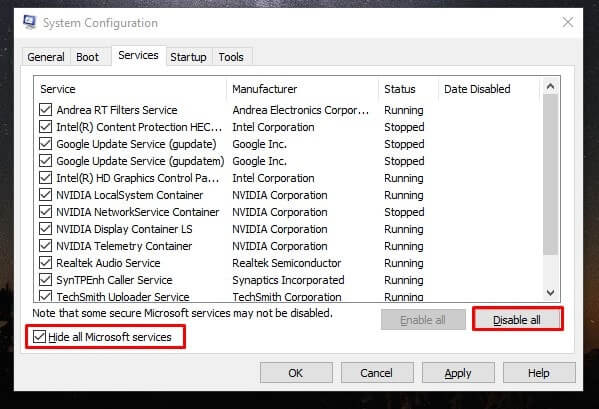
3. Go to startup tab and then click on “Open task manager”.
4. In task manager’s startup tab, disable all services. Right-click on each service, then choose to disable option.
5. Close task manager, In the system configuration Window, click OK. And, then restart your Computer.
Hopefully, this time “Service host Superfetch” will not use much CPU Power. These are the solutions, Which you can try to fix high CPU usage or disk usage problems. But, If still, you’re facing the problem. Then, you can reinstall Windows through bootable media. Don’t forget to create the backup of your important data.