A user guide to installing the latest Ghost on Ubuntu 22.04 on DigitalOcean, Configuring DNS, and Setting Up the Droplet.
Undoubtedly, Ghost is a powerful and open-source CMS. It allows one to manage blogs and publish content in a modern manner. Ghost offers modern tools to build a website or blog, send customized newsletters & allows to offer paid subscriptions to members. Yes, it also offers a Native analytics and Powerful Content Editor. That is quite better than WordPress Gutenberg Editor. So, you can consider it as one of the Best WordPress Alternatives.
For Existing WordPress Users.
If you’re currently using the WordPress Platform for your Blog. Then, you can install the Ghost plugin and Export your WordPress blog in 1 click. The plugin provides an option to download the Ghost File which contains all your uploaded images and content in JSON format.
However, if there are lots of images uploaded on your server and you face trouble downloading the zip file. Then, you can only download a JSON File. And to download media uploads, you can use WordPress File Manager or FTP. However, you have to change the directory structure as well. For that, do check Ghost’s official migration guide.
Getting Started
Since DigitalOcean is the official partner of the Ghost Project. So, we will install Ghost on DigitalOcean (DO) VPS. Yes, instead of self-hosting Ghost on DO, you can also register on Ghost.org directly to create your first blog.
Prerequisites
- A DigitalOcean Account – If you don’t have a DigitalOcean account then you can register from the following button. And, you will get a free $200 credit as a welcome bonus.

- A Domain Name. – If you haven’t then you can purchase from any domain registrar of your choice like GoDaddy, Namecheap, HostGator, Hostinger, Bigrock, or DreamHost.
Install Ghost on DigitalOcean
Create Ghost App Droplet on DigitalOcean
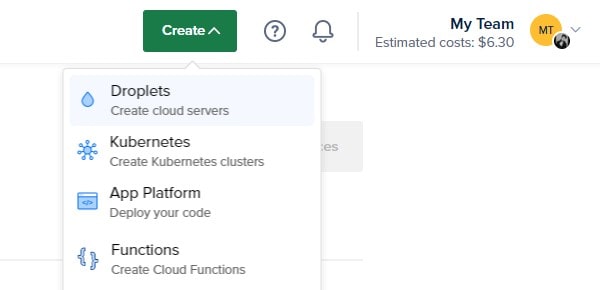
- Log in to your DigitalOcean Account. And, from the left side of the screen, click on Create > Droplets.
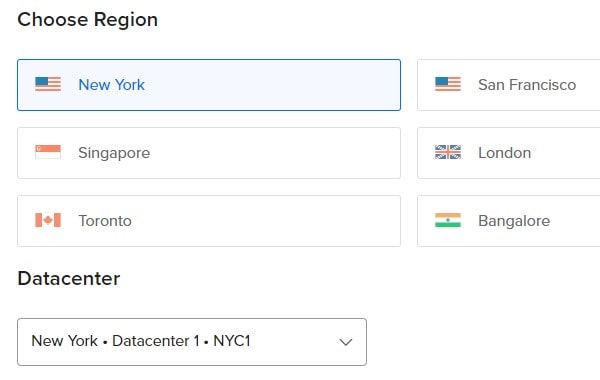
- The Create Droplets page will open. First, choose a region nearest to your users.
- After that, select a data center. You will find three data centers for each region, you can select any.
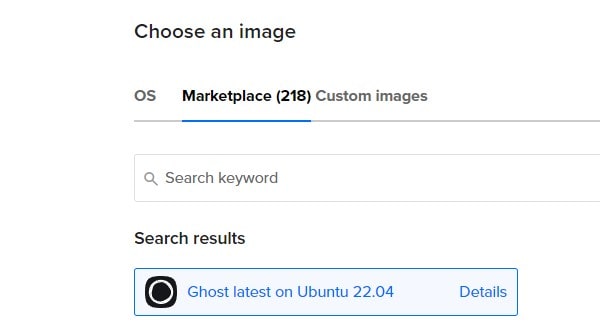
- Scroll down and from the Choose an Image section, click on Marketplace. And, search and select Ghost App. Once selected, Ghost latest on Ubuntu 22.04 will get selected.
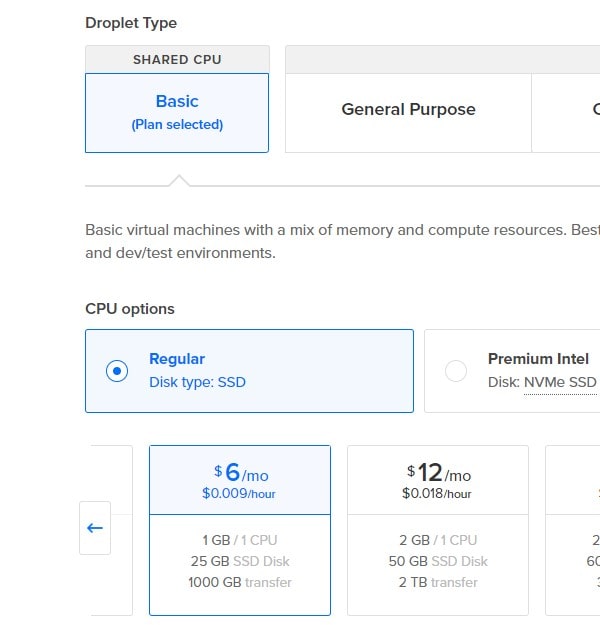
- Scroll further and now you have to choose droplet size and plan.
- Select the Basic SHARED CPU, after that, you can choose between Regular SSD, Premium Intel, and Premium AMD.
E.g. If you’re creating a completely new blog then you can opt $6/month plan under Regular SSD. However, if you’re migrating from WordPress, and your blog already has high visitors, then you can opt for higher premium Intel/AMD plans.
- Next, you can enable backup if you want, it’s paid.
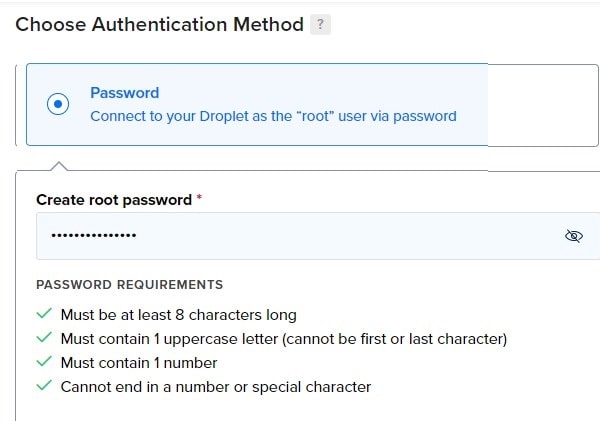
- Now, in “Choose Authentication Method ” select Password. And, create a new root password. (Note down the password somewhere safe, you might need to use it in the future.)
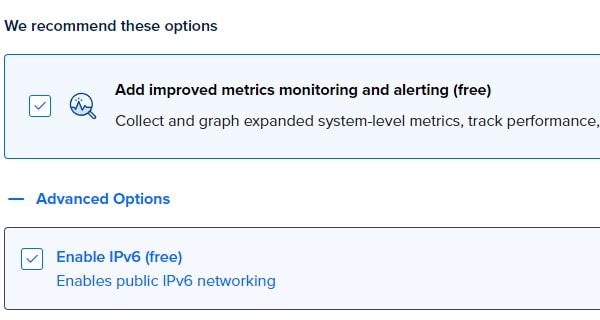
- Scroll down and enable “Add improved metrics monitoring and alerting (free)”, click on advanced options, and enable IPv6 (free).
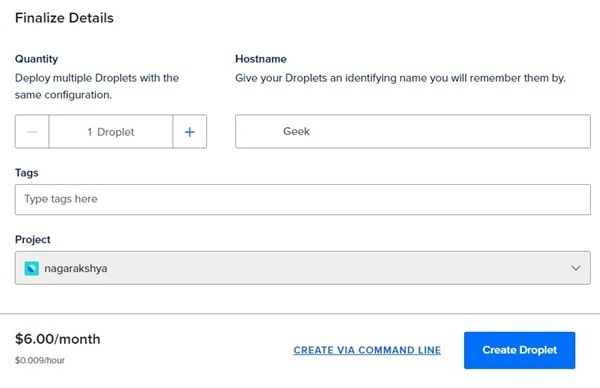
- Next, in Hostname, do enter your Website or Blog Name.
- Add any tag to your droplet if you like, else leave it empty.
- Click on Create Droplet. The droplet will be created in a few seconds, you can check the progress.
That’s it, DigitalOcean will create a Ubuntu Server with Ghost App installed on it.
Manage your DNS Settings
Next, you need to point your purchased domain name to your Droplet public IP address. So that, you can easily set up Ghost on your Website Address.
In my case, I purchased my domain from Google Domains. So, I added Digitalocean name servers to Google Domains. By doing this, I can point the domain to the IP address within the Digitalocean Website. You can also add a DigitalOcean nameserver to your domain registrar website.
ns1.digitalocean.com
ns2.digitalocean.com
ns3.digitalocean.com- After adding custom name servers to your DNS Provider. In DigitalOcean, click on Networking from the left pane, after that, click on Domains.
- Enter your domain name without www and click on Add Domain. Now, you have to add A name and CNAME.
- Create A Record – Enter @ in the hostname, and select the ghost app server. Click on Create Record. A name record will be created.
- Create a CNAME Record – Enter www and in value enter your domain name without www. And, click on Create Record. (You might need to enter complete address with www if it doesn’t auto complete.)
Yes, you can also manage DNS settings from your domain provider’s website. By adding an A name and CNAME Record. In this way, you will use your domain registrar name servers.
Once, DNS Settings are configured. Use the DNS Checker website to check Domain name is pointed correctly to the droplet IP address or not. It usually takes 24 hours, but it gets updated quickly.
Install and configure Ghost on Droplet
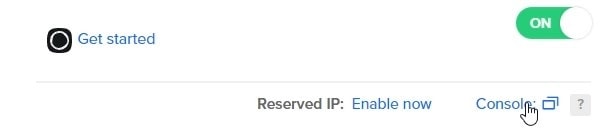
- Do click on the Droplet name you’ve created. After that, click on Console.
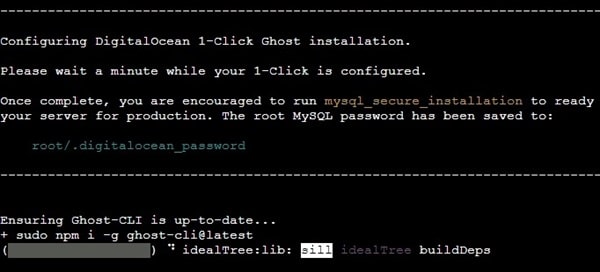
- DigitalOcean Droplet Web Console will open. The console will register the SSH key and connect to the droplet.
- Ghost will now start checking for the latest updates and will install it.
- Once the update gets installed. Ghost will prompt you for two details message will appear. Press enter any key from the keyboard to continue.
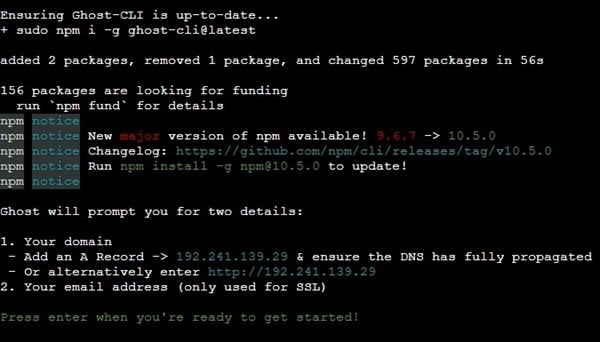
- Ghost will now start checking for all dependencies and will set an install directory. And, start installing dependencies. This process will be completed in 5 parts and will take time. For me, it took, half an hour.
- Once, the installation process is finished, Ghost will ask you to enter the blog URL. Enter your blog URL and press enter. (Make sure your domain is pointing to the IP address correctly.)
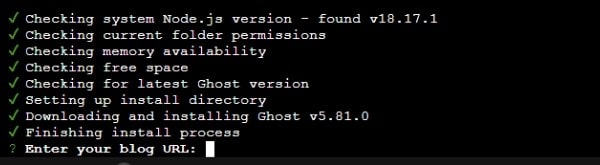
Note: If your blog URL isn’t ready, then you can enter the public IP address of your Ghost Server. And, later you can set up a Ghost site domain on DigitalOcean Droplet.
- After that, it will ask you to enter your email address for SSL.
- Once, Ghost installs the SSL certificate starting Ghost message will appear. Do wait until you see “Ghost was installed successfully”. You will also find a URL to access your Ghost website. Copy and open it in the new Chrome tab.
- Welcome to Ghost window will open. Now, create your admin account.
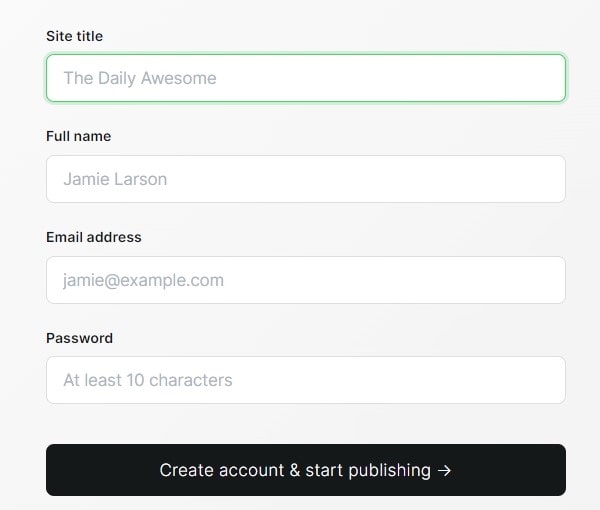
- That’s it, now you can access your Ghost Website control panel and start publishing content.
Setup Ghost site URL (If used IP address.)
If you have entered the IP address instead of the domain URL during the Ghost setup process. Then, now you have to add a domain. Here, I am assuming you’ve set up the DNS properly.
- Close and reopen the Web Console. And, do run the following command.
sudo -i -u ghost-mgr- Now, to navigate the Ghost installed directory, type the following command.
cd /var/www/ghost/- To configure and set up the URL, run the following command. Make sure to replace YourDomain with the actual domain name you purchased.
ghost config url https://YourDomain.com- Now, run the following command to set up Nginx.
ghost setup nginx- To set up an SSL certificate, run the following command.
ghost setup ssl- Next, it will install the Let’s Encrypt free SSL certificate and ask you to enter your email address.
- That’s it, now run the final command to restart Ghost.
ghost restartNow, you will able to access the Ghost Website through your domain.