If you’re wondering where to find the steam screenshot folder in Windows, Mac, and Linux. Then, this article will be helpful to you. Steam is a well-known video game digital distribution service, by Valve. Absolutely it is a kinda paradise for PC Gamers. Steam client officially comes with a built-in screenshot tool. By pressing the F12 (default function key) key, you can take a screenshot of the steam game you’re playing.
It comes in quite handy when you want to share your game score or victory with your friends. Or, it is also useful when you’re trying to troubleshoot a problem that you’re experiencing with a steam game. This means you can share the screenshot on the steam community, and seek help. Yes, definitely, steam’s built-in screenshot tool makes the screenshot capturing process simple. But, finding where all taken screenshots are saved however isn’t instinctive.
Well, don’t worry, finding the screenshot folder is as simple as taking a screenshot. You can look at steam screenshots from the client itself, or check screenshots from file explorer. Moreover, If you want to change the default screenshot folder and shortcut key, that is also possible. That’s all you will get to know in this article, let’s get started.
How to Open Steam Screenshot Folder
Method 1: Steam Screenshot Manager
The steam client comes with a Screenshot Uploader (formerly known as screenshot manager), that allows uploading all taken screenshots on the steam cloud. Or, you can share screenshots with other members of the Steam community.
When you want to take a screenshot of a steam game, you need to press the F12 key. And, when you do it, a “screenshot saved” notification popup comes. After capturing a screenshot, the steam screenshot uploader (manager) saves a screenshot of the game in that game’s respective folder. So, you just have to open the screenshot uploader, to see steam screenshots. (Is Steam not opening? Then, read my article on it.)
How to find screenshots from steam?
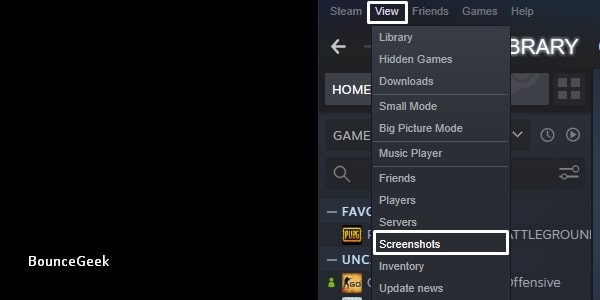
1. Open Steam Client, and from the upper-left corner of the steam, click on view.
And, click on screenshots from the view menu.
2. You”ll see, that the Screenshot Uploader window will get open. Now, to view all screenshots of a specific steam game. Click on the drop-down menu next to show, and select the game title.
As you can see, I want to view the “Fall Guys: Ultimate Knockout” game screenshots. So, I selected that game, from the list. In the same way, you can select any other game like PUBG, or CS: GO from here, and, can view screenshots
From here, you can now upload any screenshot on the steam cloud or community. Or, you can delete and manage screenshots.
3. To open the screenshot folder of that selected steam game. Click on the “show on disk” option.
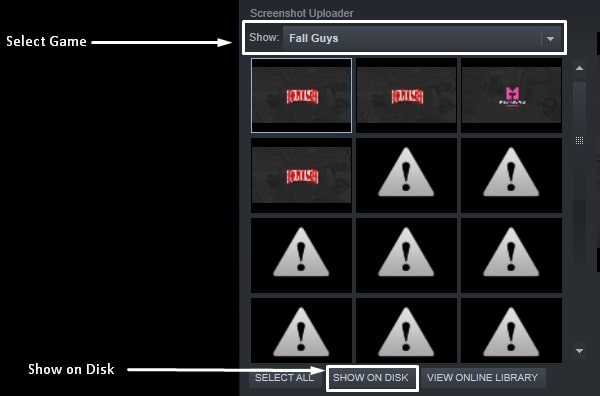
When you click on that disk option, automatically file explorer will get open with the steam screenshot folder. You can now manage screenshots locally. And, if you want you can copy and save that screenshot folder directory somewhere so that you can access the screenshot faster. You can also play retro games with Steam.
Method 2: Manually access the default screenshot folder
Opening Steam Client every time just to access the screenshot folder, is a time-consuming process. You also have to keep in mind that, screenshot folder location can vary, depending on where you have installed the steam client. Well, by default, the steam setup does install the steam client in C:\Program Files (x86)\Steam. (Here, I am not talking about the steam library. It can be different, no issue.)
By default, the steam screenshot manager does save screenshots inside this directory. You can open file explorer, and go through this directory to directly access screenshots.
C:\Program Files (x86)\Steam\userdata\SteamID\760\remote\AppID\screenshots
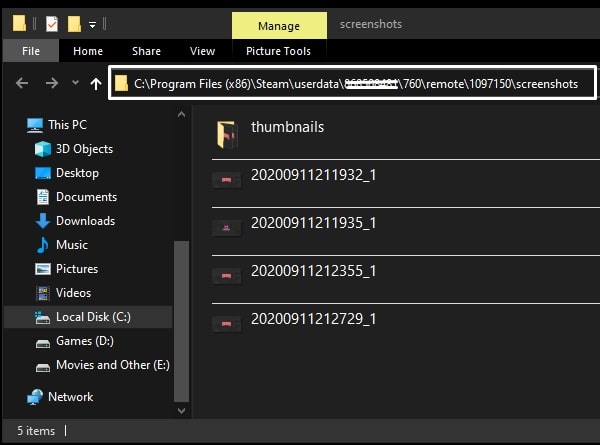
If you’re using steam in macOS or Linux, then you can find out the steam folder in the following directory.
For Mac User – Users/{MacUsername}/Library/Application Support/Steam
Linux Users – local/share/Steam
Let’s simplify this directory to access screenshots easily.
1. Open File Explorer in Windows. And, go to C:\Program Files (x86)\Steam\userdata\
2. Here, you will see a 9-digit numeric folder. (It is your steam ID.)
After that, do open the 760 Folder, and then, the remote folder.
3. In the remote folder, you will see multiple folders with some numerical digits. These are game folders created by the screenshot manager. It gets created when you take a screenshot of a new game.
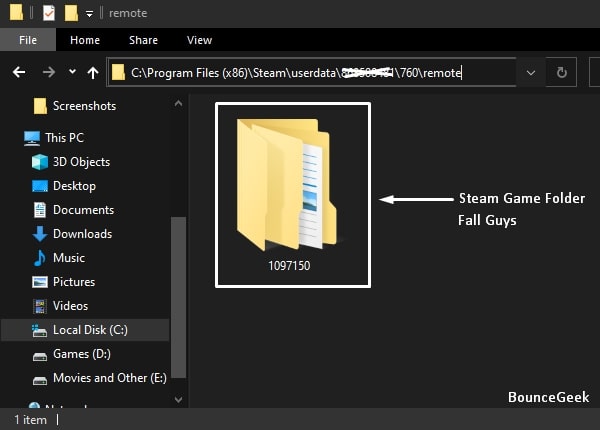
You can now open any game folder and from there you can access the screenshots folder. But, if there are too many folders inside the remote folder. Then, to save time, you can take the help of the App ID/Game ID.
How to find out the Steam App ID?
Open Google and search for the steam game title. Now, in the URL of the game, next to the app/ you can see a few digits. By using the same digits you can find a screenshot folder of a specific game inside the remote folder.

Method 3: Create a Folder Shortcut
After opening the steam game screenshot folder using Screenshot Manager. You can create a shortcut to that folder. So, you don’t need to browse the location again and again. You can create a shortcut folder for each steam game. Or, you can create a shortcut to the remote folder. And, from that folder, you can access all steam games screenshot folders. The choice is completely yours. Creating a shortcut to a folder is quite easy, follow these steps.
1. First, Open File Explorer and go to C:\Program Files (x86) > Steam > user data > SteamID > 760 > remote > AppID
2. You will see a folder named “Screenshots”. Right-Click on the folder. And, then from the context menu, click on send to > Desktop (Create Shortcut).
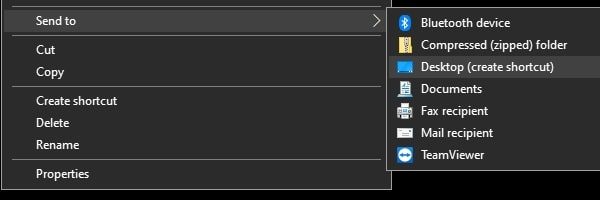
That’s it, a shortcut will get created on the desktop. And, by opening it, you will be able to access the folder easily. That’s now your “where steam screenshot folder is located” search ends.
Change Steam Screenshot Shortcut Key
The default key to taking a screenshot of the Steam Games is F12. But, if you don’t find it appropriate for any reason. In some laptops, the F12 key comes pre-assigned to do different tasks. So to avoid conflict, you can change the shortcut key.
1. Open Steam Client on your Windows PC. Click on the steam option from the upper-left corner.
And, from the steam menu, click on Settings.

2. In Settings, Click on “In-Game”.
Now, under “Screenshot Shortcut Keys”, you will see the F12 key is assigned to take the screenshot.
3. Click on the “x” icon next to the F12 key. And, press the new key that you want to use to take steam screenshots. (If you’re unable to assign a new function key then do press with Fn key.)
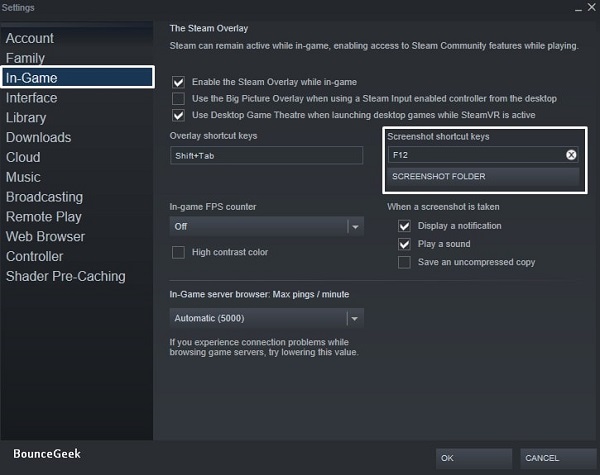
Once, a new shortcut key gets assigned click on ok to apply the changes.
How to Change Screenshot Folder Location
Officially Steam comes with a “Screenshot Folder” option. That you can access this by going into steam > Settings > In-Game > Screenshot Folder. (It’s placed below screenshot shortcut keys.) But, even if you select a different folder location with that option, still screenshot will get saved to the default directory. Well, no worries, still you can change the default steam screenshot folder using the command prompt. We are going to use the MKLink tool. Just follow the following instructions carefully.
1. Click on the start button, and search for “command prompt”. And, Run it as an administrator.
2. In the command prompt type the following command to change the directory to C drive.
cd C:\
3. Now, to create an NTFS symbolic link or change the screenshot folder location type the following command.
mklink /D "D:\screenshot" "C:\Program Files (x86)\Steam\userdata\YourSteamID\760\"

Note: Replace YourSteamID with your actual steam ID. This command will first create a screenshot folder in the D drive. And, then will move all 760 folder contents to that folder. And, whenever next time you will take a screenshot, it will appear in the D:\screenshot\remote\AppID folder. Yes, you can choose any drive you want. Don’t get confused with the screenshot, Steam ID is hidden in it.
If you find all this complicated then you can press Windows + PrtScn key to take a screenshot in Windows 10. And, you will find out all screenshots in the Pictures > Screenshots folder.
