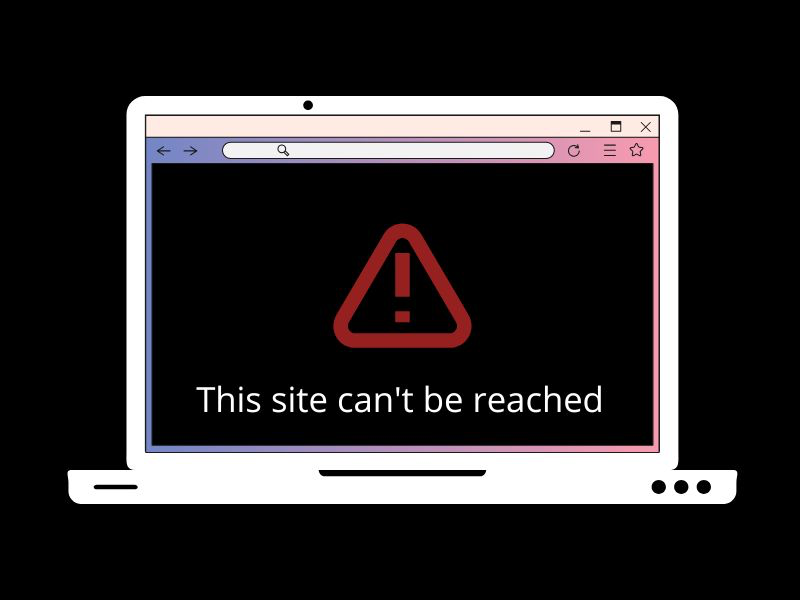
This site can’t be reached errors can appear on any requested site, like Netflix, Quora, Facebook, Instagram, YouTube, etc. First, make sure you have entered the correct web address. Though, If the error occurs on all sites, then it typically points to a network connectivity issue. Which is preventing your chrome browser from reaching the site. Generally, this problem occurs due to misconfigures network settings or due DNS lookup failed issue. So, before trying out any solution, first, make sure your Internet connection is working. Try a different web browser or device to check.
The web browser interacts with to site through IP addresses. And, the Domain Name System (DNS) translates the domain name to IP addresses. So, the browser can load Internet resources. And, when DNS get failed to translate the site address, then the browser shows an error page. The “This site can’t be reached” page comes along with various errors. For Instance:
ERR_NAME_NOT_RESOLVED
ERR_CONNECTION_REFUSED
DNS_PROBE_FINISHED_NXDOMAIN
ERR_CONNECTION_RESET
ERR_CONNECTION_CLOSED
ERR_ACCESS_DENIED
ERR_ADDRESS_UNREACHABLE
ERR_CONNECTION_TIMED_OUT
Well, whatever error code chrome is showing for you. If you’re not able to reach any website in chrome, then here’re the solutions to try.
This site can’t be reached – Solutions
For Website Owners – If you are the website owner who is facing this error on your own site. Then, this article is not for you. But here is the tip: Do check your nameserver configuration. And, make sure your server IP address is correctly linked to your domain address. Restarting the server also can fix this error.
Solution 1: Check Website Status
It might be possible that the website you’re trying to reach is currently down due to maintenance. By checking the site status, you will know that the problem is with the site or your browser. Well, there are two ways to find out.
First Method
1. Open the “downforeveryoneorjustme” website. (If this site is also not opening, then skip this solution. Try the next one.)
2. Enter the website URL that you want to check and then click on “or just me?”.
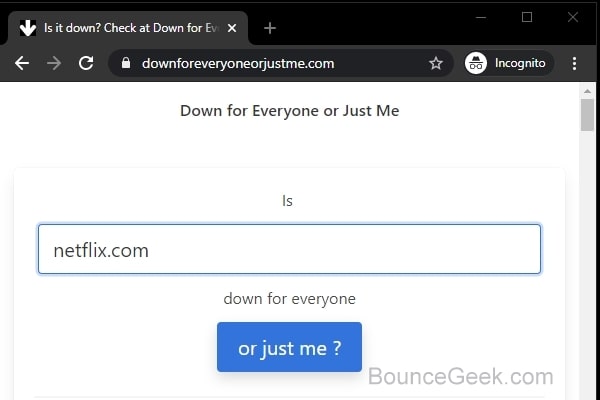
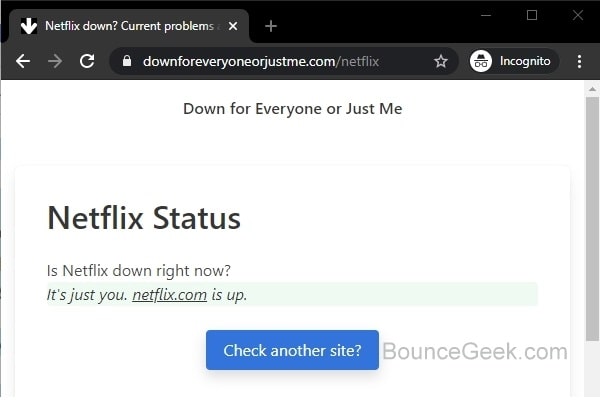
3. Now, in a couple of seconds, you will be able to find out that. The problem is with the site, or from your side. (If the site is working you will get a message. It’s just you. “site” is up.)
Second Method
I call it the old-school method. In this method, we will ping the site domain name using CMD. And, if ping gets fail, and “Request timed out” like, an error appears. It means the site isn’t working.
1. Click on the Start button, and type CMD in the search bar. Command Prompt App will appear, click on “Run as administrator”.
2. In CMD type ping www.example.com (replace example with the actual site that shows the “This site can’t be reached” error.)
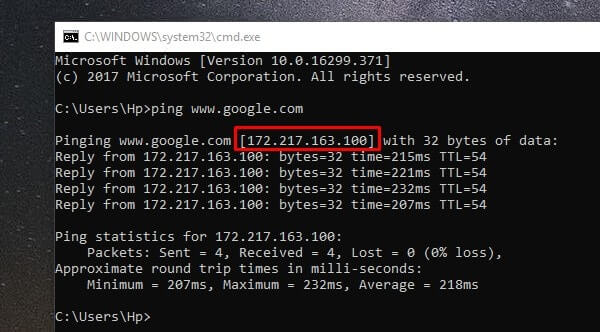
If the ping result shows 0% packet loss. And, sent and received packets quantity is also the same. Then, it means the site is up and running. The problem is just with your browser. So, in this case, you can try the next solutions.
Solution 2: Do open the site with an IP address
If the problem is with DNS. And, the DNS-related error showing. Then, you can try to open the site with the IP address.
Which you can find out in ping results. (The numbers next to reply from, is the IP address of that site.) Now, just copy the IP address and open it in any browser. If the site gets open, then, follow the DNS-related solution mentioned in this article.
Solution 3: Clear Browser Cache and Data
When you visit a Website, your web browser does store temporary data of, that webpage. So that next time that website can load faster with the help of cache files. But, if chrome has stored the error information of the webpage in the form of a cache.
Then, the same error information will appear every time because of the cache. In that scenario, clearing the cache will empty all previously-stored site information. And, next time when you open the webpage, it will download everything new about that website.
This solution work when the site is working fine in all other browsers, so do try it out.
For Android Users
1. Hold down the Chrome icon for a second. Tap on App info.
2. Tap on storage & cache.
3. Chrome storage page will open. Tap on clear storage and then tap on clear all data.
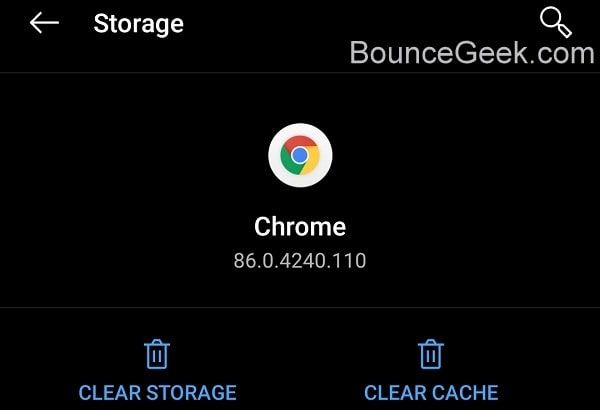
Note: This option will delete all saved information in Chrome, including login details. Though, If you just want to clear cache then just tap on Clear cache.
For iOS/iPad OS Users
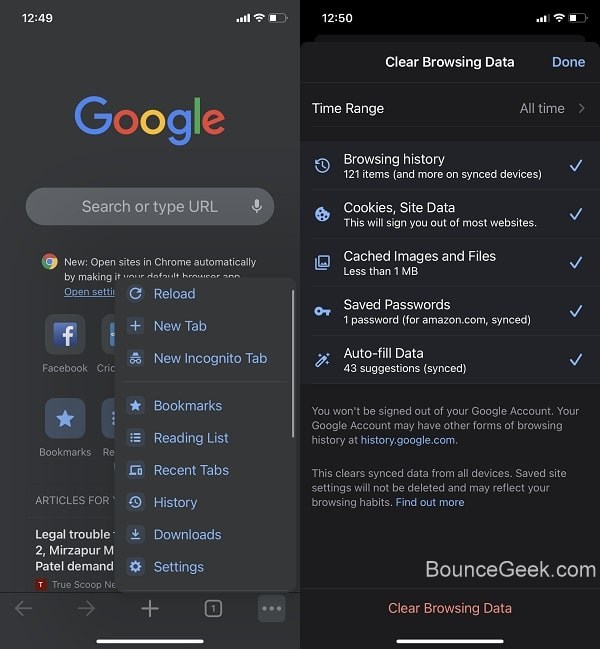
1. Open Chrome App on your iPhone/iPad.
2. Tap on More … (horizontal ellipsis icon)
3. Tap on History > Clear browsing data.
4. Select “All time” in the time range. And, make sure there is a tick mark next to “Cookies, Site Data” and “Cached Images and Files”.
5. After that, just tap on “Clear Browsing Data”.
If such an error occurs in Safari, then go to settings > Safari. Scroll down and tap on “Clear History and Website Data”.
For Windows/macOS Users
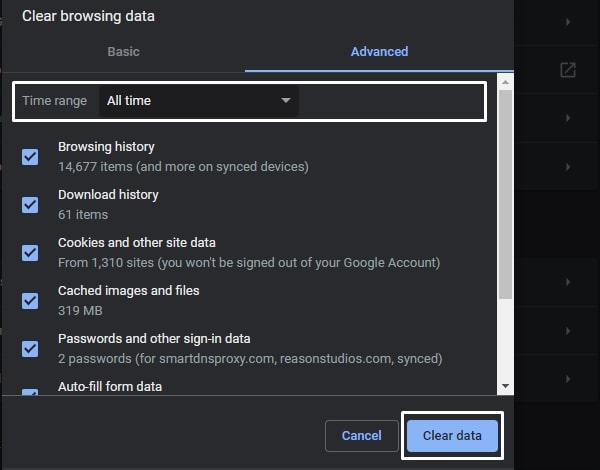
1. Open the following URL in Chrome Web Browser.
chrome://settings/clearBrowserData
2. Click on Advanced > Select “All time” in the Time range.
Now, make sure, that browsing, cookies, and cached options are selected. Click on Clear Data. Like Android, This option will delete all saved information from Chrome Web Browser.
Solution 4: Flush DNS and Reset TCP/IP Address
Your system keeps records of the domain names and IP addresses, that you have accessed in past. So, If the site owner has shifted the site to another server then the IP address of the site also gets changed. So, you should clear your DNS cache from time to time.
1. Open Command Prompt (Admin) or you can use Windows PowerShell. (Press Windows + X key to open Windows PowerShell (Admin)).
2. Run these following commands one after one in CMD or PS.
ipconfig /release
ipconfig /all
ipconfig /flushdns
ipconfig /renew
netsh int ip set dns
netsh winsock reset
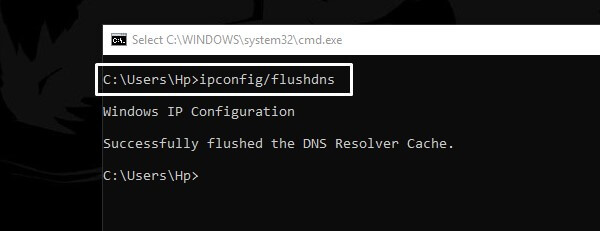
Once, you run all these commands, restart your Windows.
Solution 5: Restart DNS Client Service
DNS Client service helps to resolve Domain Name. And, if due to some software conflict, DNS service isn’t working properly. Then, you have to restart it.
1. Press Windows + R key to open the run window.
2. Type “services.msc” and press enter.
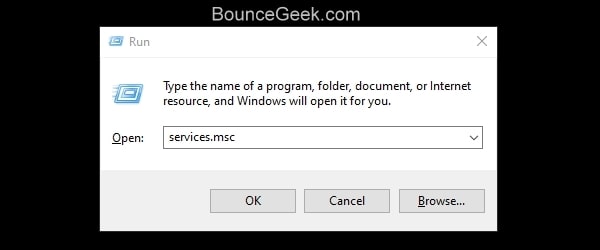
3. Services Window will get open. Look for “DNS Client”.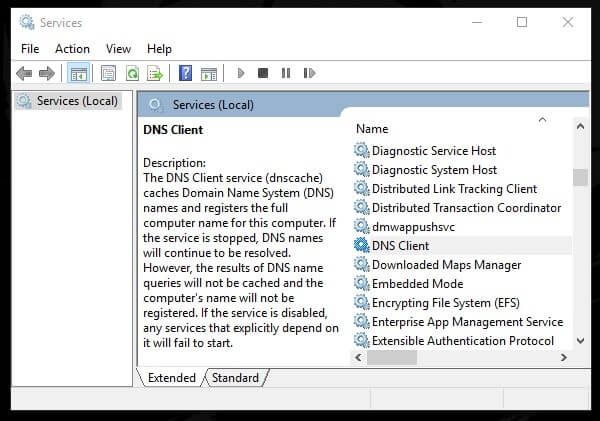
4. Right-click on DNS Client and then click on the “restart” option.
Solution 6: Change IPv4/IPv6 DNS server addresses
If after clearing the cache and data of the Chrome browser. Still, a DNS error appears on the “This site can’t be reached” page. Then, you have to change your DNS server address.
For Windows Users
1. Press Windows + R key.
2. Type ncpa.cpl and press enter.
3. In Network Connection Window. Right-click on your active internet connection, then, click on properties. (It could be WiFi or Ethernet.)
4. Select Internet Protocol Version 4 (TCP/IPv4), click on properties.
5. Now, select the “Use the following server DNS addresses” radio button. And, enter the following Google Public DNS IP addresses.
Preferred DNS Server: 8.8.8.8
Alternate DNS Server: 8.8.4.4
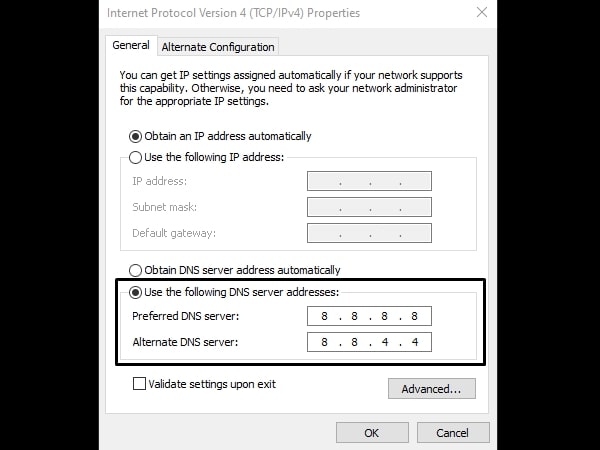
Click on ok.
6. From the same Ethernet/WiFi properties window, scroll down and select Internet Protocol Version 6 (TCP/IPv6), click on properties. Select the radio button and then enter the following IPv6 address details.
Preferred DNS Server : 2001:4860:4860::8888
Alternate DNS Server : 2001:4860:4860::8844
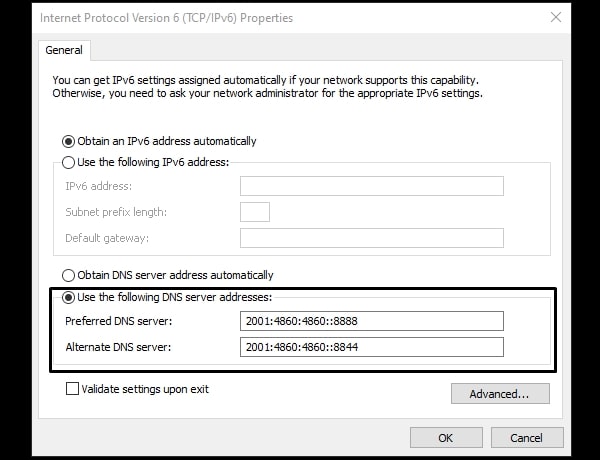
Click on Ok.
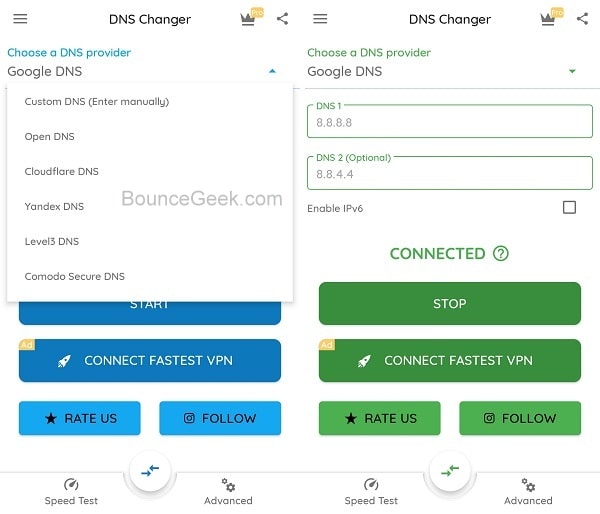
For Android Users
On Android, you can change DNS using DNS Changer App. This App offers many DNS Providers, including Google, Cloudflare, Open, Level3, and Comodo Secure DNS.
1. Install the “DNS Changer | Mobile Data & WiFi | IPv4 & IPv6” app on your android smartphone.
2. Open the app, accept the privacy policy, and continue as a free user.
3. Select a DNS Provider, and click on ok. And, do allow connection requests.
4. That’s it, the selected DNS server will get connected.
Now, try to open the site, which was showing DNS related error.
Solution 7: Disable extension, or Reset the browser.
Sometimes, extensions like Adblock create conflict with some websites. And, browser shows, this site can’t be reached, error. And, if clearing out data from Chrome does not fix the error, then try resetting the browser. Resetting the browser will also disable all active chrome extensions and will clear temporary data.
1. Open the following URL in Chrome Browser.
chrome://settings/resetProfileSettings?origin=userclick
2. Click on Reset Settings.
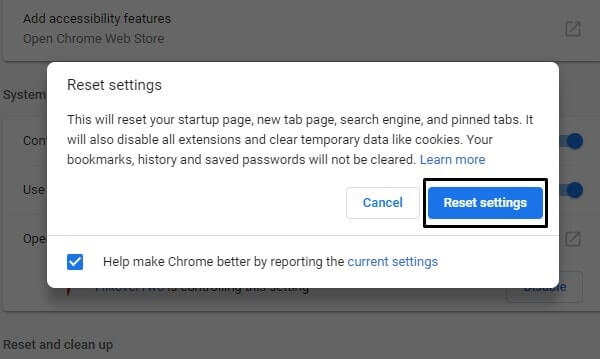
Chrome settings will get reset and all extensions will get disabled. Now, try to open the site, which was not getting open before.
Solution 8: Reset Chrome flags settings.
If you have made changes in Chrome Flags settings and after that, this issue occurred. Then, you can simply reset it.
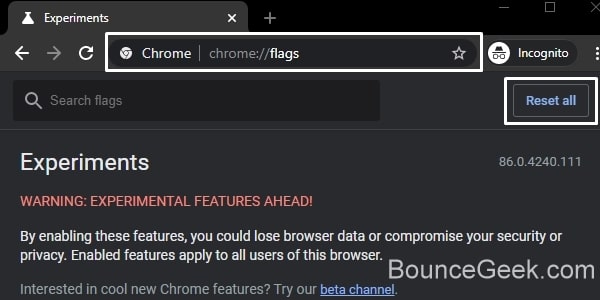
1. Open the following URL in Chrome.
chrome://flags/
2. Click on Reset All. And, restart Chrome Browser.
Solution 9: Run Network Troubleshooter.
Windows provides a troubleshooter for every issue. And, there is a troubleshooter available for Internet-related problems. That can help to diagnose and fix network problems. Though, sometimes it only shows error information. And, with that error information, we can find out the exact cause.
- Press Windows + I key to open the Settings App.
- Click on Network & Internet > Network Troubleshooter.
- Select the network adapter, if it asks.
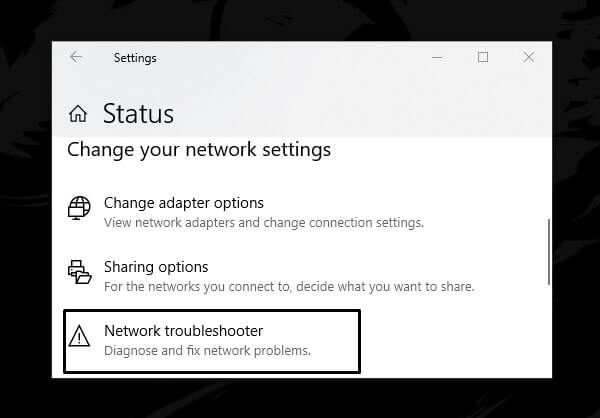
That’s it, the network troubleshooter will now run and will try to find out the issue.
Solution 10: Reset Network Settings.
If after making changes in DNS nothing works. Then, you can try this solution. This solution will set all network settings to default. So, if, due to some changes made by you this problem is occurring. Then, you can fix it by resetting network settings.
- Open the same network & internet Window, in Settings App.
- Click on Network reset option.
- Click on Reset now > Yes.
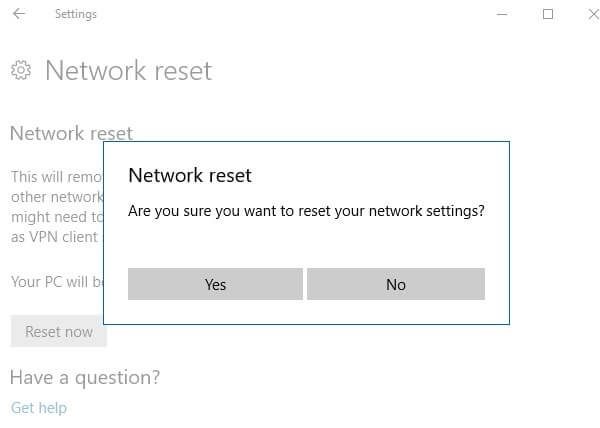
That’s it, network settings will now reset. If you were on a WiFi connection, then you need to enter the password again.