
Recently, I have downloaded all seasons of Friends TV show in the MKV file format. But, there are two audio tracks in every video: Spanish and English. Unfortunately, Spanish is the default track. And, I want to remove the Spanish and keep just the English audio. Yes, I can switch the audio track in any video player. But, doing this for every video feels a bit irritating. However, I found some ways to easily Remove Audio Tracks from Video.
Sometimes, you might also come across a similar problem. Maybe you want to remove all audio tracks. And, I want to add other audio files to the video later. Or maybe, you have recorded a video through your smartphone. And, the video captured some irrelevant sounds. Maybe you want to replace it with some soundtracks such as music. Well, no matter, whatever is the reason for removing the audio track from a Video is. Here are some of the best ways to do that. You can now also add subtitles to the video.
Add/Remove Audio Track from Video on Windows 11
MKVToolNix
MKVToolNix is free and open-source software. It is a collection of tools for the MKV (Matroska Multimedia Container) Files. Available for macOS, Linux, BSD, and Microsoft Windows. With this tool, you can remove the audio track from MKV files. And, can add another track to it.
1. First, download the latest version of MKVToolNix from its official website.
2. Right-click on the MKVToolNix setup file and click on the administrator. UAC window will appear, click on Yes.
3. The MKVToolNix setup window will appear. Do follow the on-screen instructions and install it in your system.
4. When the MKVToolNix application gets installed, open it. In the source files section, right-click and select “add files”.
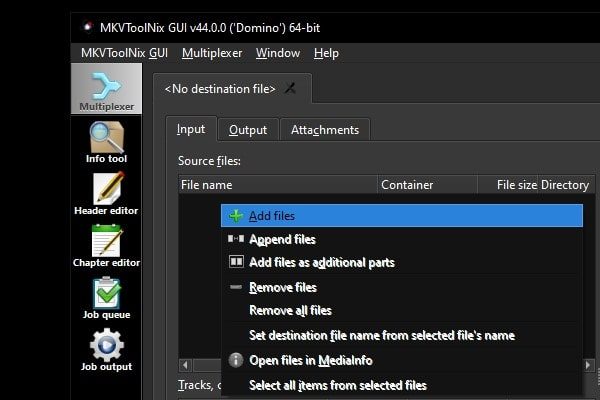
5. Select the video file and click on Open. From which you want to remove the audio track. If you want to add another audio track or subtitle file to that video. Then, in the source files section, add them also.
6. After adding the video file and audio track in MKVToolNix. It will show you all audio tracks, subtitles, and tags files.
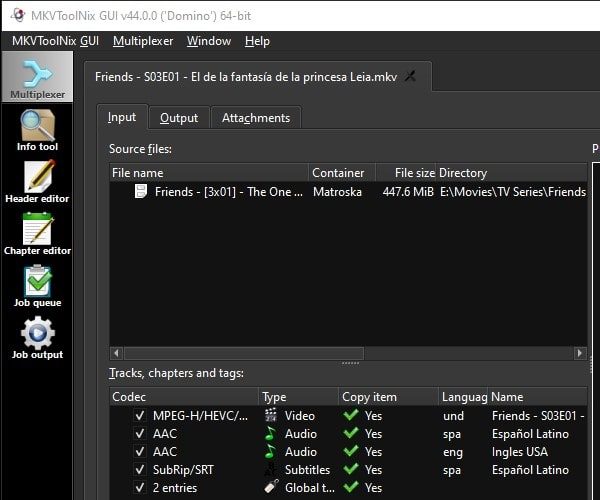
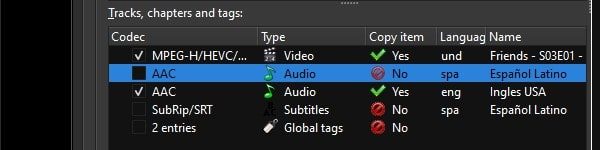
7. You just have to unmark the audio track and subtitle file. That you want to remove from the video. (As you can see, I unmarked Spanish audio track and subtitle.)
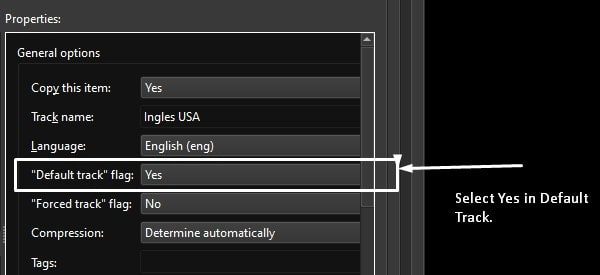
8. And, if you just want to set an audio track default. Then, first, select the audio track. After that, in the properties window. You have to select “Yes”, in the default track.
9. To export the video, click on output. select the destination folder and click on “Start multiplexing”. (Make sure the file title is correct.)

10. The process will take only a few seconds to complete. When it shows 100% in the progress bar. Check the destination folder, and play the video. That’s it. You have removed the audio track from the video.
VLC Media Player
If you want to remove all audio tracks from a video file. Then, you can use the VLC media player. Because VLC does support almost all video formats. VLC offers a wide range of powerful manipulation and editing tools. You just have to dig a little deeper.
Remove Audio from Video using VLC.
1. I am assuming, that, VLC is already installed on your PC.
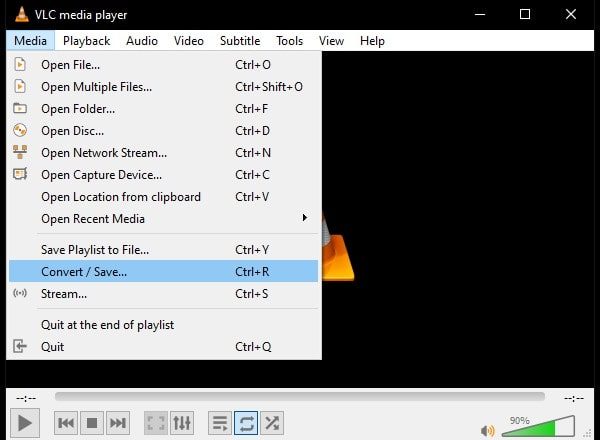
2. Do open VLC and click on Media > Convert / Save. (Alternatively, you can press Ctrl + R hotkey.)
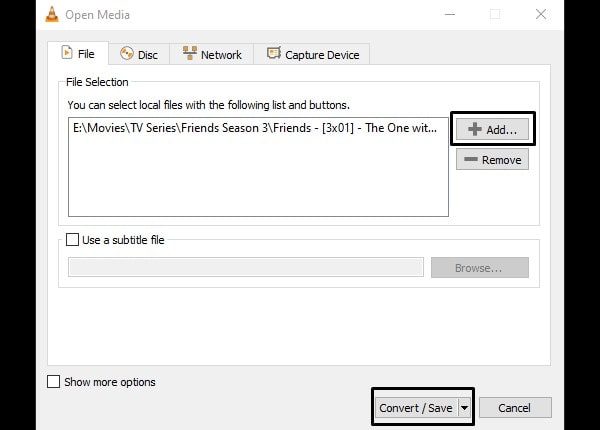
3. Click on “Add” and select the video file that you want to edit. And, click on Convert.

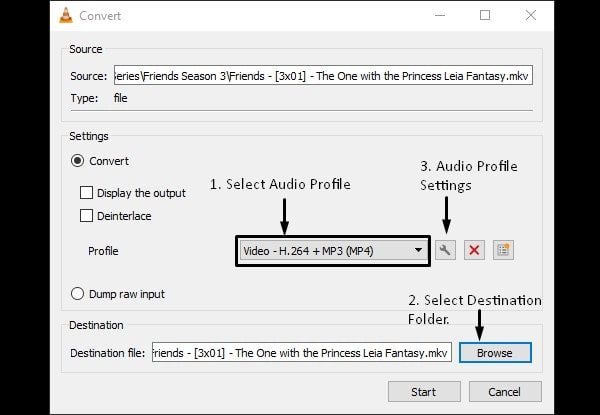
4. On the next window, select the audio profile. And, then select a destination, where you want to store video output. (Select the different destination folder. Else, the main file gets overwritten.)
After that, click on the “spanner” icon.
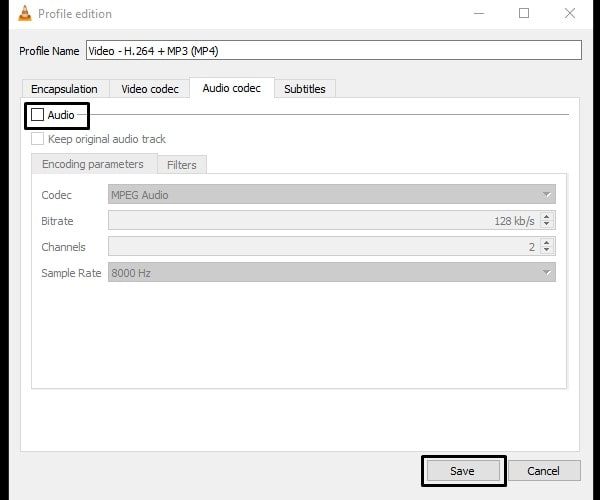
5. The profile edition window will open. Click on “Audio Codec”. And, unmark the “Audio” option. Click on Save.
6. That’s it, click on start. The process will take time according to the video length. Don’t close VLC between the running process.
iMovie
iMovie comes built-in into macOS, iOS, and iPad OS devices. It is a basic movie editing tool, best for social media influencers. With iMovie, you can easily remove audio. I have tried iMovie in my iPad Air.
1. First, open the iMovie App, and tap on the “+” icon to create a new project.
After that, tap on the movie and select the video, and tap on “Create Movie”.
2. In the editing section, tap on the video. And, you will see the “Detach video” option.
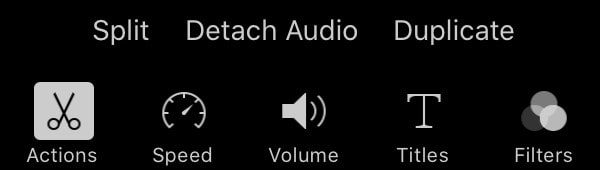
3. The detach option will split the timeline into audio and video. Select the audio and tap on “Delete”. After that, tap on done.
4. Now, use the “export video” option and save the video somewhere. And, save the media with a different file name. So that you can undo or redo the changes.