Google Assistant for PC – There is no doubt that Google assistant is one of best voice assistant apps. I am personally using on my Android device and Google home to do some tasks. Among many things, I use Assistant for play music, call people, remind me things and also for shopping. If you’re running Android 5.0 and higher, then you can Get Google Assistant on your Android device.
Command Prompt and Terminal Emulator.
As I said earlier, Google assistant is now not available in GUI version you need to run some line of command. That’s why to run those commands you need Terminal Emulator in Mac and Linux and Command Prompt in Windows PC.
Install Python on your PC. (mandatory)
To run Google Assistant, you need to install Python 3.0 or higher on your PC. If you are a Windows user, then Download Python from here. Mac and Linux operating system comes with Python Pre-installed, but check which version you’re using by typing “Python” on terminal emulator. And if you’re using older version then update using Python Website.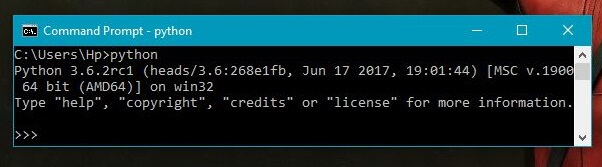
If the version is not showing for you after typing Python in command prompt/terminal emulator. Then rerun python setup and choose to modify option and then mark all option and click on Install.
Set Google Assistant API and get Secret Client ID.
Before start giving commands first, you need a Client Secret ID JSON file. And to get that file you need to set Google Assistant API by Creating Project. Follow these steps for your JSON file to Get Google Assistant on PC, Mac, and Linux.
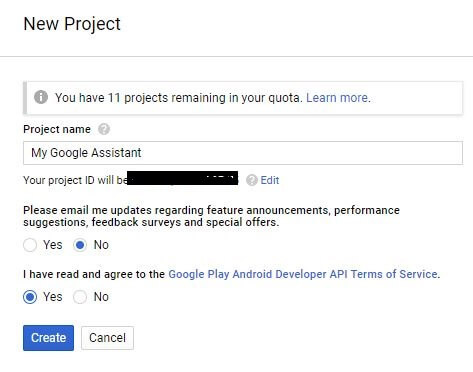
Go to Google cloud platform project page and then click on Create Project, After that name the project My Google Assistant and click on create.
Wait for few second Google cloud platform will assign you a unique ID, after that it will be brought to your Project’s configuration page. If not then simply click on notification icon and then click on your project name.
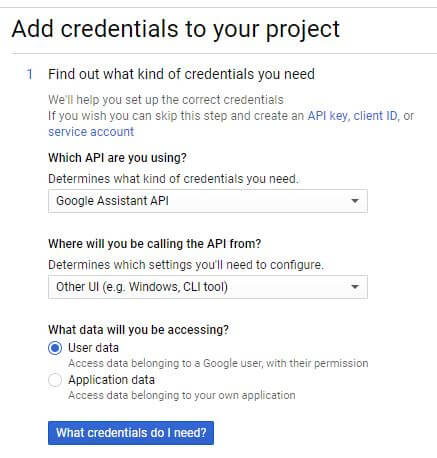
Go to google assistant API page and click on enable, now Google will warn you to create credentials. click on create the credential option to go to add a credential to your project page.
In where will you be calling the API from select other UI (e.g. Windows, CLI tools) and select User data option. After that, Now tap “what credentials do I need?”
Google should recommend that you create an OAuth 2.0 client ID. Name the Client ID anything you want, for example, BounceGeek. After picking up the name click on Create client ID. After that, it will ask Product name enter My Google Assistant and then tap on continue.
It will show you an option to download but don’t download from there click on done. Now under OAuth 2.0 client IDs click on the product name and on next page you’ll found an option to Download JSON.
Install Google Assistant on Pc, Mac, and Linux.
Open command prompt / Terminal Emulator and give the following command and hit enter. This command will help you in downloading some google assistant SDK Files, these files are needed for this python project.
py -m pip install google-assistant-sdk[samples]Once it’s done now enter the following command and don’t forget to adjust the path of that JSON file that you downloaded.

Right click on JSON File and then click on Properties > System, now you will see object name that is the path of JSON File copy it and replace with JSON File Path.
py -m googlesamples.assistant.auth_helpers --client-secrets JSON File PathIn the command prompt, you will see a response telling you to visit a URL in order to authorize the application. copy that URL and paste into your Web Browser to visit and authorize by using same Google account that you used before to create Project. Copy that Access token and paste it into the command prompt where it asks you for the authorization code. If done correctly, you will see a response that your credentials have been saved.
Now you’ll get an access code, Copy that Access token and paste it into the command prompt where it asks you for the authorization code. If done correctly, you will see a response that your credentials have been saved.
Test Google Assistant.
The first thing you want to check is, google assistant is able to record audio from a microphone or not. Enter the following command to check, it will record 5-second audio and repeat it for you.
python -m googlesamples.assistant.audio_helpersIf you hear audio back then it means you have successfully installed or Get Google Assistant for PC and to Run Google Assistant every time use the following command.
python -m googlesamples.assistantAfter giving this command wait for Google Assistant to say “press Enter to send a new request”, then press Enter to begin talking to Google Assistant.
Conclusion.
By using this method, you can use Google assistant in this command way, you’ll enjoy few minutes by doing it, but if you want GUI based Google Assistant then you need to wait for Google to Launch. Else wait for some unofficial software build of Google Assistant. Keep the following Blog, I will update you if I found any other Good way. Or if you know any latest working method to Get Google Assistant for PC then Feel Free to comment.